Here are the step-by-step instructions for setting up your RemoteApp so that you can open AM.Net hosted on the CDS Cloud.
If you are resetting a RemoteApp that has already been set up before, follow step 3A; otherwise, you can skip from Step 2 directly to Step 3B.
If your device has never connected to the NEW CDS Cloud skip from Step2 directly to Step 3B.
At Step 6 you will need the RemoteApp credentials that should have been provided to you separately. If you do not have those credentials, contact CDS using this email address: [email protected]. Please be aware that at Step 6 you need to check the box to remember your password. This option is available only during the initial set up of the RemoteApp.
The differences between the old cloud connection and the new connection are in Step 4 (using “gateway2” instead of “gateway” in the URL) and in step 8/9 (Start menu folder is now named “AM.net Cloud”, instead of “Work Resources”)
[1]
Open the Windows Control Panel.
If you see “View by: Category” in the upper right corner, change the option to “Large Icons.” This will make the RemoteApp item visible instead of buried under other options.
[2]
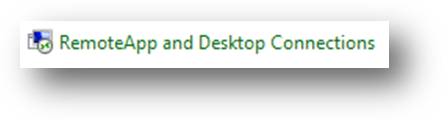
Choose “RemoteApp and Desktop Connections”.
[3][A]
If you already have a connection set up, click Remove in the lower right corner of the connection properties. If you don’t have a previous connection set up, go straight to [3][B].

[3][B]
Click “Access RemoteApp and desktops”

[4]
Enter this URL in the box:
https://gateway2.cdscloudhost.net/RDWeb/Feed/webfeed.aspx
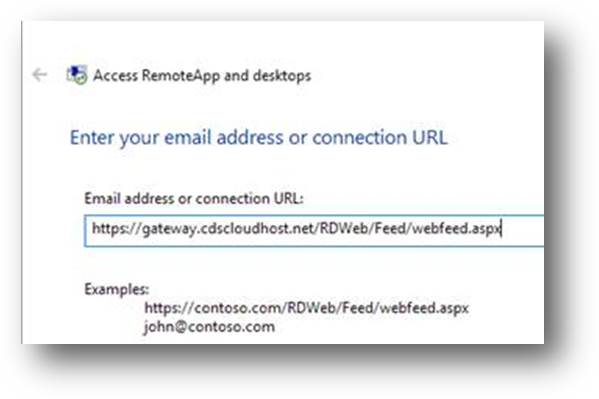
Click Next
[5]
This is just a confirmation screen, click Next again.
[6]
You will be prompted for the username/password that we provided initially. If you do not have these handy, let me know so I can send a secure link with the credentials again.
MAKE SURE TO CHECK THE BOX TO REMEMBER THE CREDENTIALS!
[7]
It might take a few seconds to complete, but you should get a final “Complete” type screen.
Just click OK to acknowledge it.
[8] Click “Control Panel Home” in the upper left corner.

[9]
Open the Credential Manager.

[10]
Switch the listing to Windows Credentials.

[11]
Locate the credential for TERMSRV/1253641-TS1.CDSCLOUDHOST.LOCAL. Expand the listing by clicking the V shaped icon on the far right of the credential listing (step 1 in the screenshot below). Then click Remove (step 2 in the screenshot). Click Yes when you are prompted to confirm deleting this credential.

[12]
Click to add a new generic credential.

[13]
Enter TERMSRV/1253641-TS1.CDSCLOUDHOST.LOCAL as the “Internet or network address.” Put in the user name we sent you, using the format as shown in the screenshot below. Enter your cloud password. Then click OK.

[14]
You now have an AM.Net item in your start menu under “All Programs” (or “All Apps”) and then “AM.net Cloud”.

[15]
And that’s it. Click to launch.
You should see the regular AM.Net startup sequence and get to the AM.Net login screen