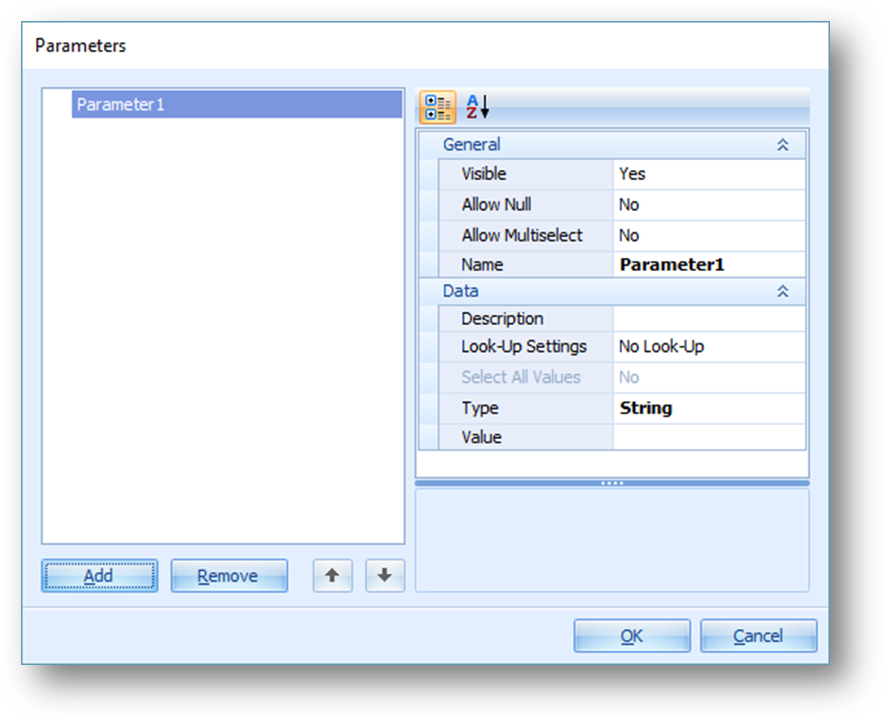
Use dashboard parameters to give the end-user of the dashboard the ability to modify values that affect the output of the dashboard. Dashboard parameters can be used in the following contexts:
•Query Editor parameters
•Filters on dashboard items
•Conditional formatting expressions
•Calculated field expressions
To create dashboard parameters in the Dashboard Designer, click the Parameters button on the Home ribbon.

Then click the Add button in the lower-left of the Parameters form.

Each setting controls one aspect of the parameter function.
•Visible: When set to “No,” the parameter will not show up for the end user to change. This can be useful if there is a value that should change annually or so and must be manually updated, but the value is not something the end-user of the dashboard needs to change every time the dashboard updates the data.
•Allow Null: When set to “Yes,” the parameter can be left completely blank.
•Allow Multiselect: When set to “Yes,” the user can check the boxes next to multiple values for the parameter. Only certain comparison operators will work properly with multiselect parameters: “is any of,” “is none of,” “in,” and “not in.”
•Name: This is the term that is used for behind-the-scenes references to the parameter. It cannot include spaces. Parameter names are case-sensitive.
•Description: This is what the end-user will see as the name of the parameter. It can include spaces.
•Look-Up Settings: When set to “No Look-Up,” the user must type the parameter value directly into a blank box. Changing this to “Static List” adds the Values property that allows you to define a fixed set of values that will populate a drop-down box for the user to use to select the parameter value. Changing this to “Dynamic List” adds several properties so that the parameter drop-down box will populate with query results. These properties are:
o Data Source: Always set this to Data Warehouse.
o Data Member: Set to the query that contains the column you want to use for the drop-down list. (Tip: for a selection of year values, use the [Dues Year Snapshots] query.)
o Value Member: Set to the column with the data for the drop-down list of parameter values.
o Display Member: Set to the column with the labels for the data that the user will select. Usually this will be the same as the Value Member, but sometimes you may want the user to select from a list of plain text values but have the value be something else, such as an Event acronym or individual ID number.
o Sort By: Set to the column that will determine the order in which the values are listed. Usually this will be the same as the Value Member, but could be something else if you want to sort by some other value. For instance, you could create a custom query that counts the number of events that a facility has hosted, and then you could sort the list by the count of events.
o Sort Order: The only options here are ascending and descending.
•Type: The type of value the parameter will pass onto the filter or expression that references the parameter.
•Value: The default value of the parameter. If there is nothing entered as the default value, the dashboard will not display any information until the user provides some value for the parameter.
After you supply the required settings for the parameter, click OK to add the created parameters to the dashboard.
The dashboard provides a built-in Dashboard Parameters dialog, which provides the capability to change dashboard parameter values. This dialog is created automatically, depending on the parameter type and visibility settings.
To open the Dashboard Parameters dialog while viewing a dashboard, click the Parameters button (a page icon with a gear) in the upper right corner of the dashboard window.