Purpose: Tracking of various address information on a file maintenance record.
Example: There are many different addresses that can be tracked in the system. This document will outline the main addresses that can be kept for a person or firm.
An address is made up of the following fields.
Firm Name: The name of the firm. This field is only seen where applicable.
Firm Name(cont.): Continuation of the firm name. This field is only seen where applicable.
Street Address: The physical street address.
PO Box: Primarily intended for PO Box. Can be used for continuation of street address, if necessary.
Abbreviations and Punctuation: Addresses should be entered using USPS standards. Do not include punctuations in the Street or PO Box address lines. Use the USPS abbreviations in both address lines (ie.. Ste for suite, Apt for apartment, Rd for road, Ln for lane, Ct for court, Blvd for boulevard, Dr for drive, Pl for place, Ave for avenue, and St for street). Also use abbreviations on directional information (ie.. N for north, SW for southwest). When entering post office box information, enter as PO Box.
When data is add/edited in the Street or PO Box line these validation checks are run. Note: To save the data as is click Yes on the validation message. To edit the data click No on the validation message.
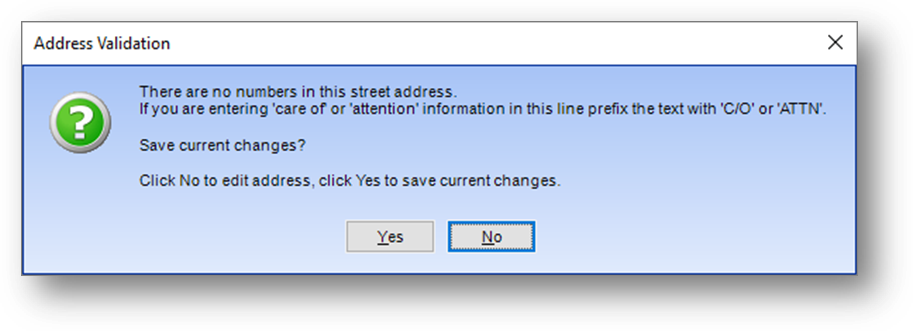
When the Street line has text, but no numbers, this validation message is shown. If the text is for ‘care of’ or ‘attention’ information, the text should be preceded by “C/O” or “ATTN”.
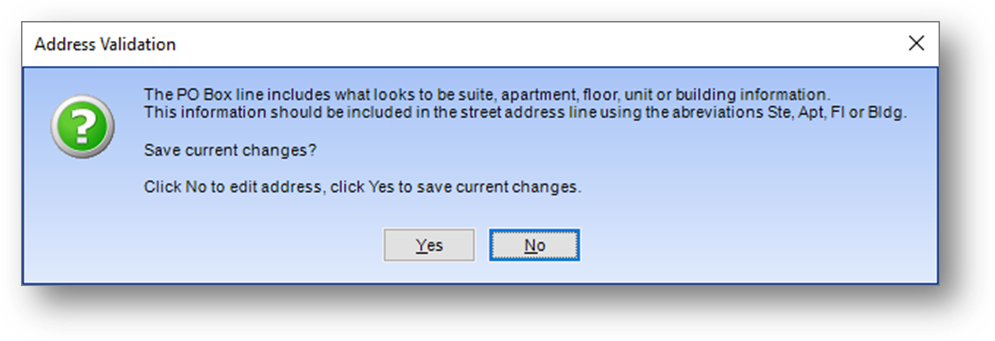
When the PO Box line has “Suite”, ‘Ste”, “Apartment”, “Apt”, “Fl”, “Floor”, “Unit”, “Bldg”, or “Building” contained in the text, this validation message is shown. This information should be entered using USPS standards and included in the Street line.
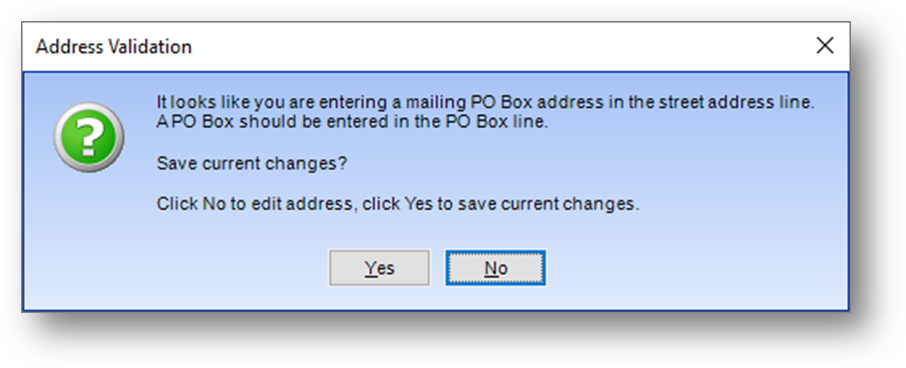
When the Street line has “PO Box”, ‘Box”, “Drawer”, or “PMB” contained in the text, this validation message is shown. This information should be entered in the PO Box line.
Note: For those who subscribe to the optional PTK software/data package for address updates, it is recommended that the street address line be used only for the physical street address, including suite or apartment number, and the po box line only be used for a mailing address. Entering information in the incorrect line, or using one of the address lines for non address information such as a firm name, can result in the loss of data.
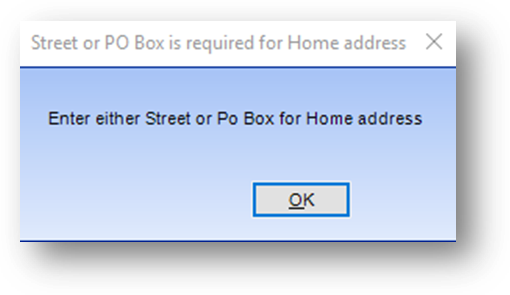
Validation checks are also run, in Names, to verify that there is an address in either Street or PO Box.
City: The city of the address.
State: The state of the address. Allowed values are all U.S. states, territories, and protectorates, plus certain Armed Forces designations. Note: To enter a foreign country address select “ZZ Foreign Address” from the State drop down list or type in “ZZ”. This will disable the entry into the Street Zip and Mail Zip fields and enable the Country field.
Street Zip: Zip code associated with street address.
Mail Zip: Zip code associated with PO Box/mailing address. Defaults to the street zip, which can be overwritten as needed.
Country: Name of foreign country, province name and any special mailing codes can also be included.
Names
In Names file maintenance the addresses are displayed on the Name tab. The various addresses are detailed below.
Office Address
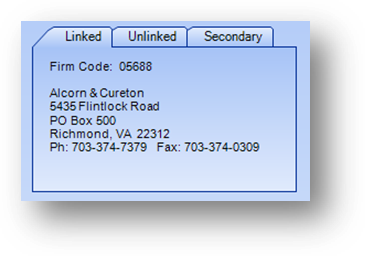
A names record can have either a linked or unlinked firm record associated to it. A linked firm is one where the firm is set up in Firms file maintenance. An unlinked firm is used when the decision has been made to not set the firm up in Firms file maintenance. The information for an unlinked firm is only available for that one Name record. A secondary firm link can also be set for the individual but this is very rare.
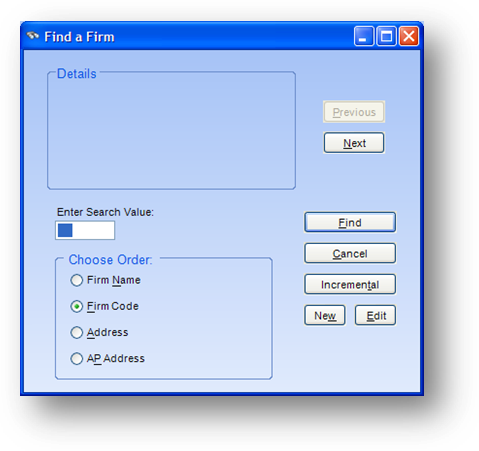
To add a linked firm, click anywhere on the Linked tab and the Find a Firm search window will open. Locate the firm you want to link and click OK.

You can also right-click anywhere on the Linked tab to open the context menu and select Link to a Firm. The Find a Firm search window will open. Locate the firm you want to link and click OK.
To edit a link to a firm, click anywhere on the Linked tab, or right-click and select Link to a Firm from the context menu. This will open the Find a Firm search window. Locate the new firm and click OK.
To delete a link to a firm, right-click anywhere on the Linked tab to open the context menu and select Remove Link to Firm.
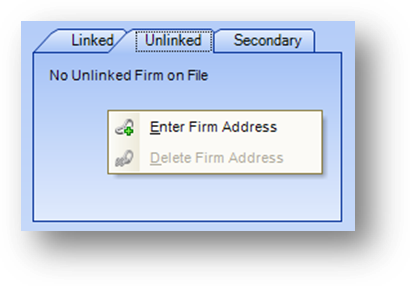
To add an unlinked firm, click anywhere on the Unlinked tab, or right-click and select Enter Firm Address from the context menu, and the Add New Unlinked Firm Address window will open.
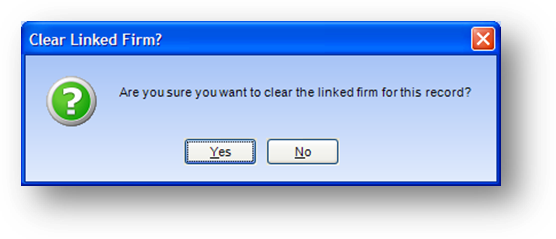
If you have an existing linked firm, a message will be shown asking if you are sure you want to clear the existing link to a firm. This is because you cannot have both a linked and unlinked firm on a Names record.
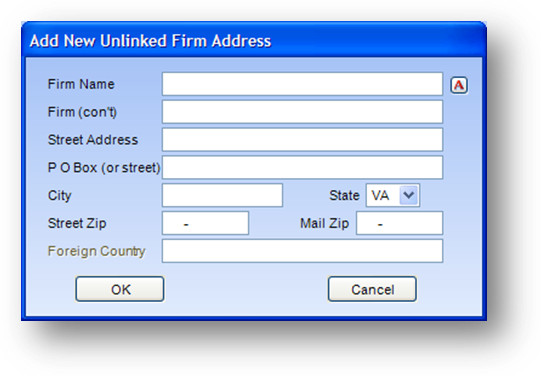
On the Add New Unlinked Firm Address window, enter the firm information and click OK.
To edit an unlinked firm, click anywhere on the Unlinked tab, or right-click and select Enter Firm Address from the context menu, and the Add New Unlinked Firm Address window will open showing the existing unlinked firm information. Edit as needed and click OK.
To delete an unlinked firm, right-click anywhere on the Unlinked tab to open the context menu and select Delete Firm Address. You can also delete an unlinked firm address by right-clicking and selecting Delete Firm Address from the context menu.
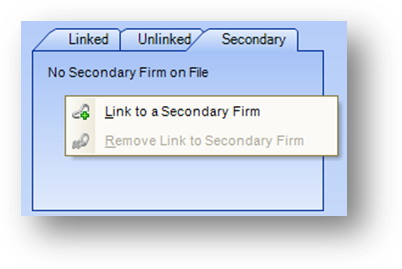
A secondary firm link functions just like a linked firm.
Home, CE, Products, and Temporary Addresses
The Home, CE (continuing education), Products, and Temp (temporary) address all function in a similar manner.
To add one of these addresses, right-click anywhere on the appropriate tab to open the context menu and select New XXX Address. The fields on the tab will become enabled. If there was information displayed in the fields prior to going into add mode, it will be cleared.

Enter the address information and click Save on the file maintenance toolbar.
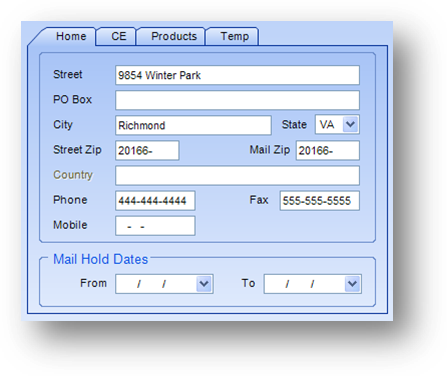
Two of the addresses, home and temporary, have a date range associated with them.
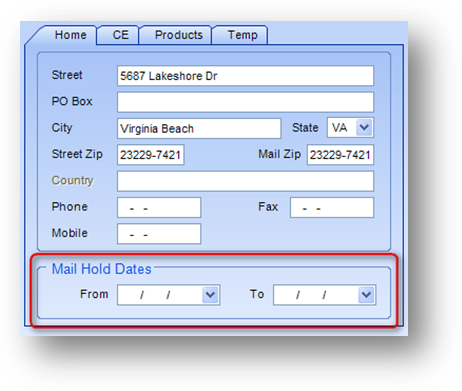
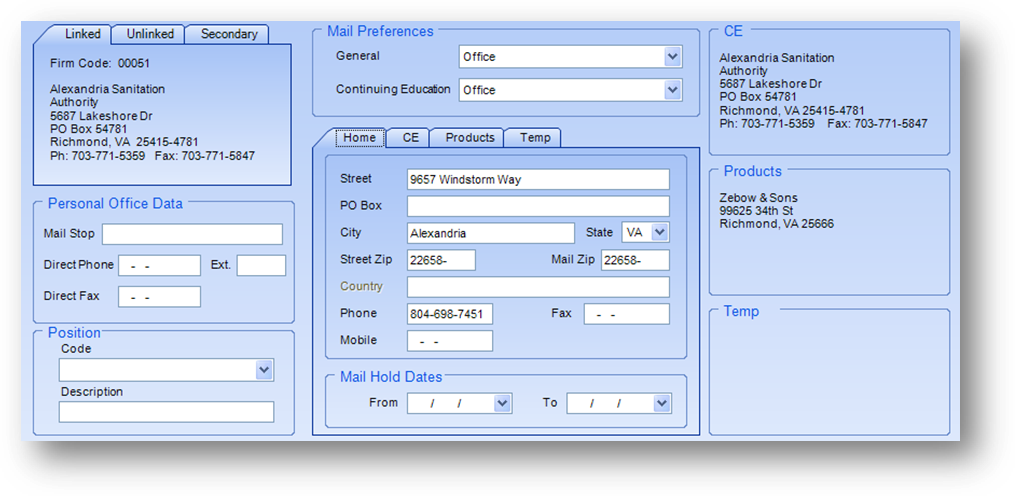
The Mail Hold Dates on the Home address tab do not directly relate to the home address. These dates relate to the individual and show the date range that they have requested there be a hold on any mail sent to them, regardless of their address preference. If no end date is entered, mail will be held indefinitely, which can be useful when an existing address is found to be invalid and the person cannot be contacted.
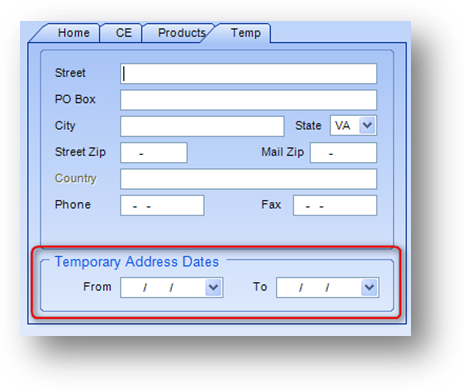
The dates on the Temp address tab do directly relate to the temporary address and are required. When a temporary address is added you must enter the date range that the address is valid. Note: When a temporary address is used, the home/office addresses and the general/CE mail preferences should not be changed. The temporary address will automatically override the normal preference for the date range specified.
To edit one of these addresses just make the needed changes in the fields and click Save on the file maintenance toolbar.
To delete an address right-click anywhere on the appropriate address tab to open the context menu and select Delete XXX Address.
Note: If a CE or products address has not been entered, you will still see an address displayed. This is because they default to using the appropriate mail preferences address. For example, if there is no products address entered on the record, and the general mail preference is set to home, then the home address information will be displayed on the Products tab. In this case the fields and the Delete Products Address listing on the context menu are disabled letting you know that there is no special products address on the record.
Address Display
The address display panel on the right-side of the Name tab displays the addresses not currently selected in the add/edit tab area. As you select a tab in the center of the screen making it the active address tab, the addresses displayed in the panel changes to display the addresses on the unselected tabs.
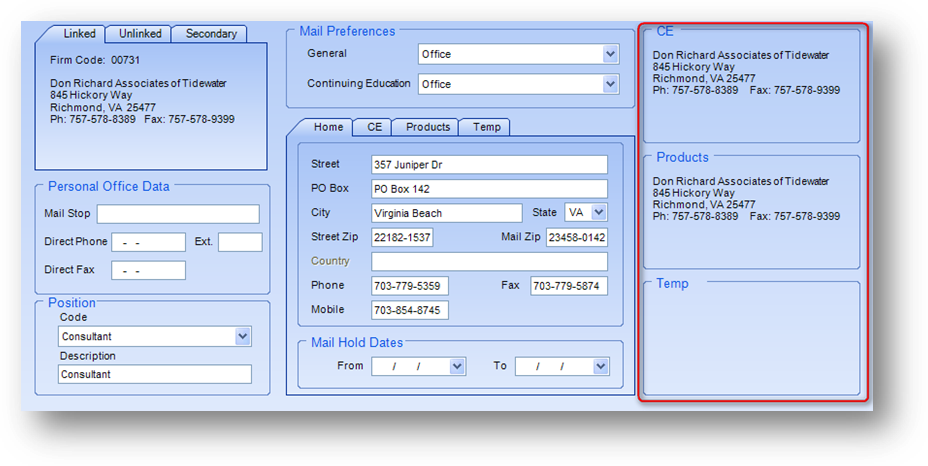
The image above shows the active tab as Home. Therefore, the display panel shows the CE, Products, and Temp addresses. Because there has been no CE or products address added to this record and the mail preferences are set to office, the linked firm address is displayed as the CE and products address. There also is no temporary address on the record, so that address is shown as blank in the panel.
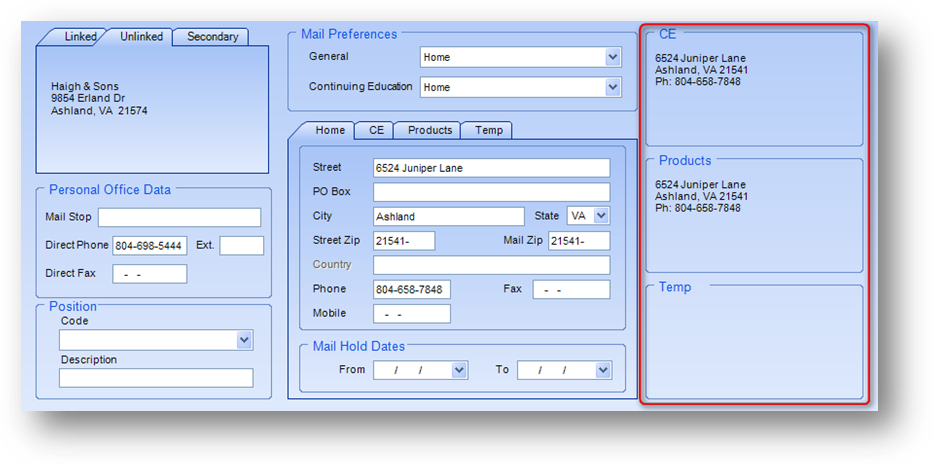
On this record, the mail preferences are set to home. Since there is no CE or product address added to this record, the address information shown in the panel for CE and products is the home address.

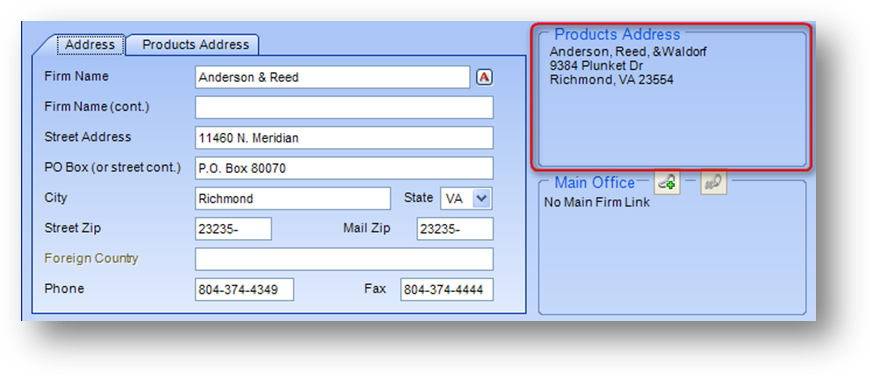
This record has a products address on it, so even though the general mail preference is set to office, it is the specially designated product address that is shown in the address panel.
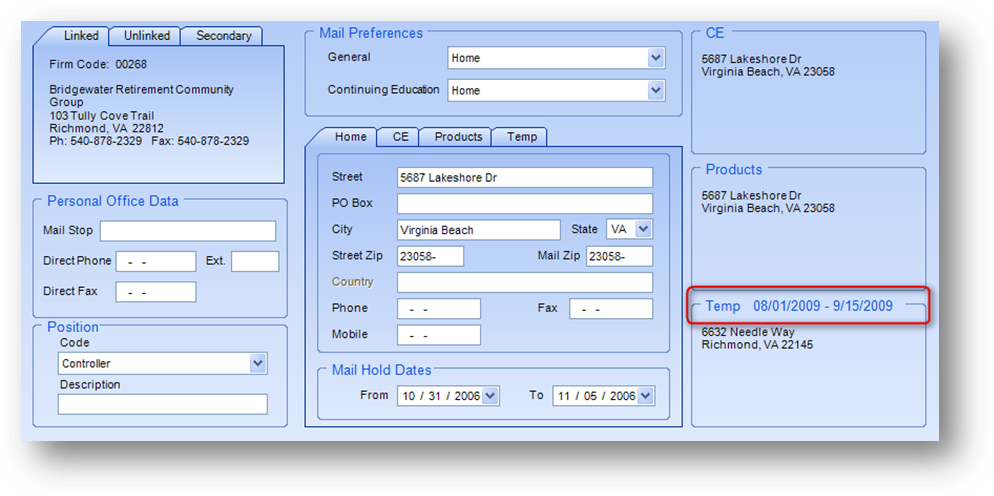
When there is a temporary address on a record, the temporary address dates will be shown above the temporary address in the address panel.
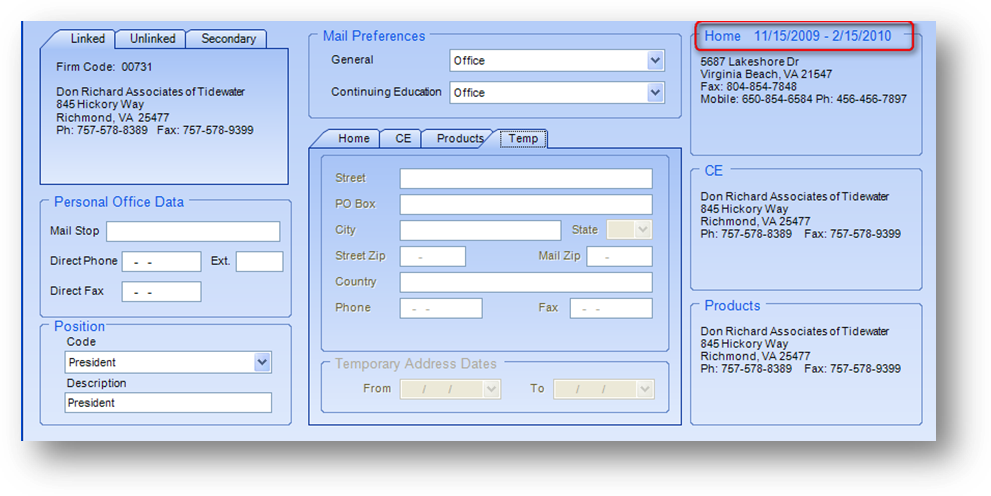
When there are mail hold dates on a record, they will be shown above the home address in the address panel.
Firms
In Firms file maintenance, the addresses are displayed on the Name and Accounts Payable tabs. The various addresses are detailed below.
Firm Address
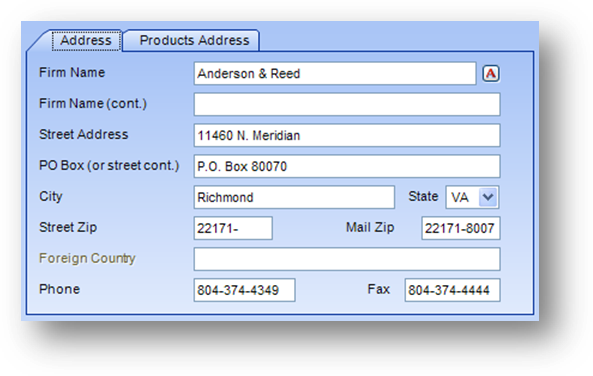
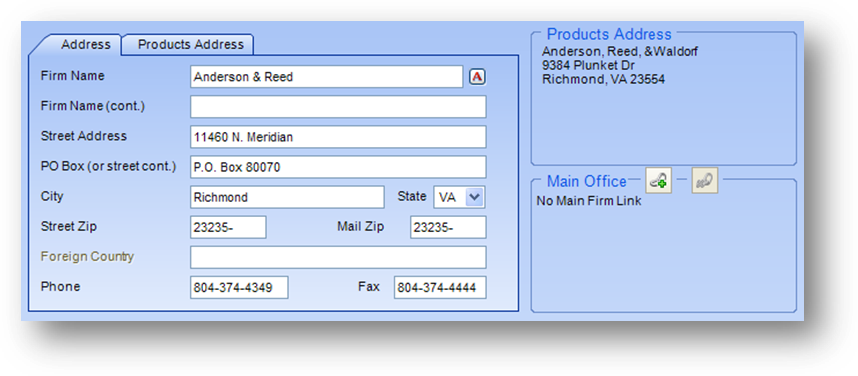
The firm address and product address are displayed on the Name tab. The Address tab is the main address of the firm. If there is a different address that is to be used for product sales it would be found on the Products Address tab.
When a firm record is added, the information on the Address tab is required. When changes are needed in the firms address, make the changes directly in the fields on the Address tab. These fields are always enabled unless you do not have security rights to edit a Firms record.
Note: Since a firm address is required it cannot be deleted.
Products Address
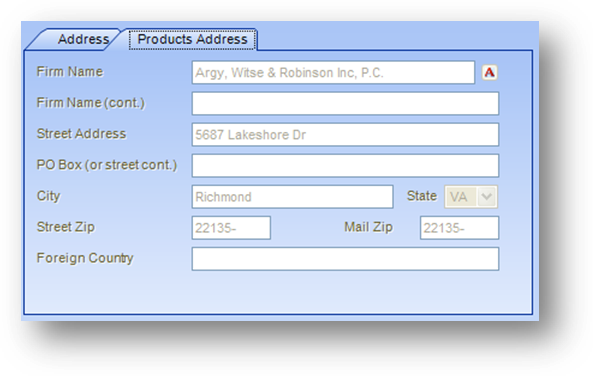
If the record does not have a product address then the information from the Address tab will be displayed and the fields will be disabled. This is because the firm address from the Address tab is used as the product address if there is not a special product address specified on the record.
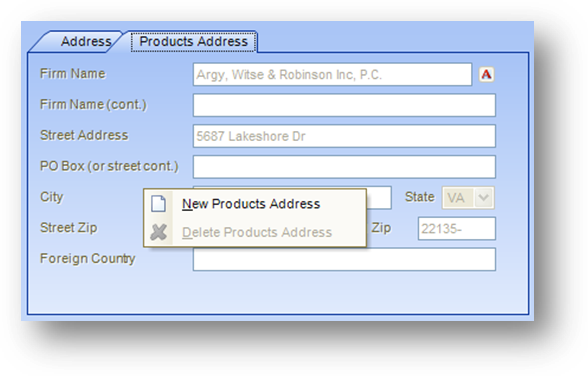
To add a products address, right-click anywhere on the tab to bring up the context menu and select New Products Address.

The fields will become enabled and the displayed data will be cleared. Now you can type the product address information into the fields.
After entering the information, click the Save icon in the file maintenance toolbar.
To edit, make the needed changes in the fields on the tab and click Save on the file maintenance toolbar.
To delete, right-click anywhere on the tab to open the context menu and select Delete Products Address.
Address Display
The address display panel in Firms is located just to the right of the address tabs. It will show whichever address is not currently selected in the add/edit tab area.
This firm has a product address. The Address tab is the active tab so the display area shows the products address.
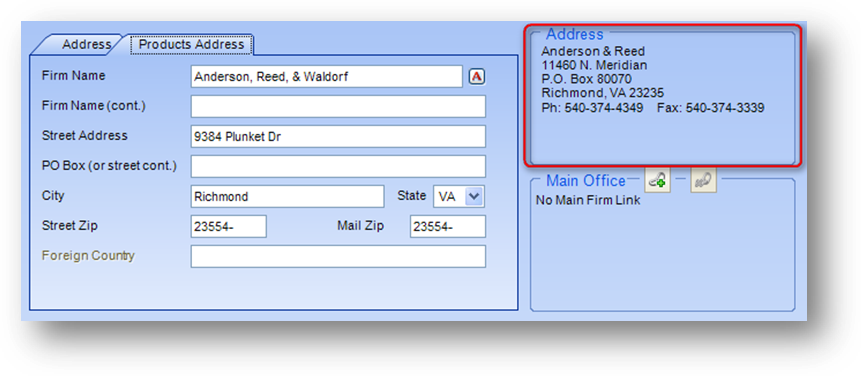
When you click on the Products Address tab to make it the active tab, the display area switches to show the firm address.
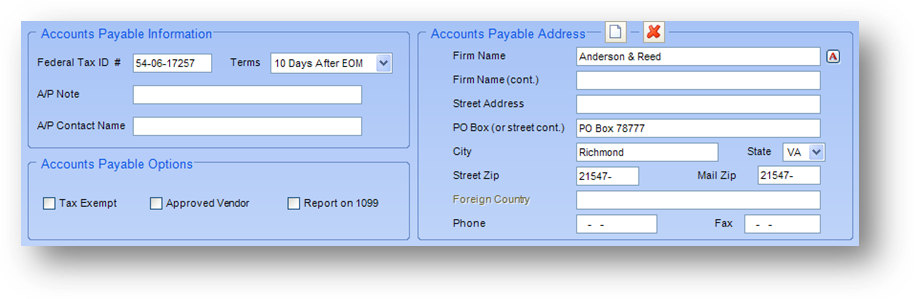
Accounts Payable Address

The accounts payable address on the Accounts Payable tab functions similarly to the products address. If the firm does not have an accounts payable address then the firm address information is displayed and the fields are disabled.

To add an accounts payable address you can either right-click anywhere on the Accounts Payable Address section and select New Accounts Payable Address from the context menu, or click the Add button at the top of the Accounts Payable Address section.
Enter the address information and click the Save icon in the file maintenance toolbar.

To delete, either right-click anywhere on the Accounts Payable Address section and select Delete Accounts Payable Address from the context menu, or click the Delete button at the top of the Accounts Payable Address section.
Watch the Names Addresses training video: