Purpose: To enter event payments for multiple employees of a firm within one routine. One payment is entered for all individuals selected for payment.
Launch Point: This routine can be launched from the following location(s):
•Firms à File Maintenance à Routines Drop-Down Menu à
•Utilities à Routines à Cash Receipts à Cash Receipts Batch Entry à
à Click on Firm button to enter check from firm
à Click down arrow on Event Payments button à
•Firms à File Maintenance à Summary Tab à
à Click on Events link text in the Employee Account Balances grid
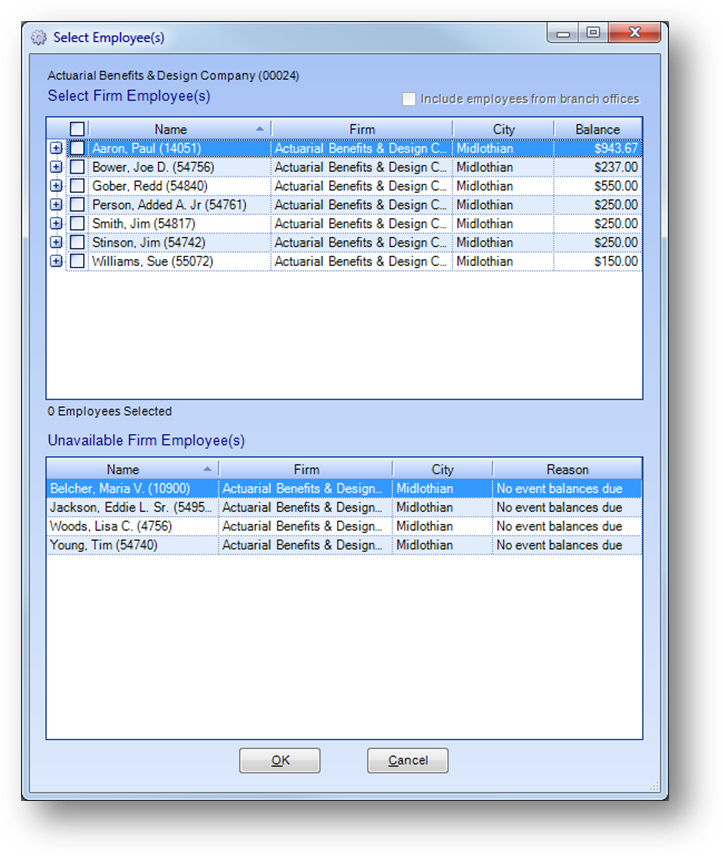
Example: When the routine is launched a window will open
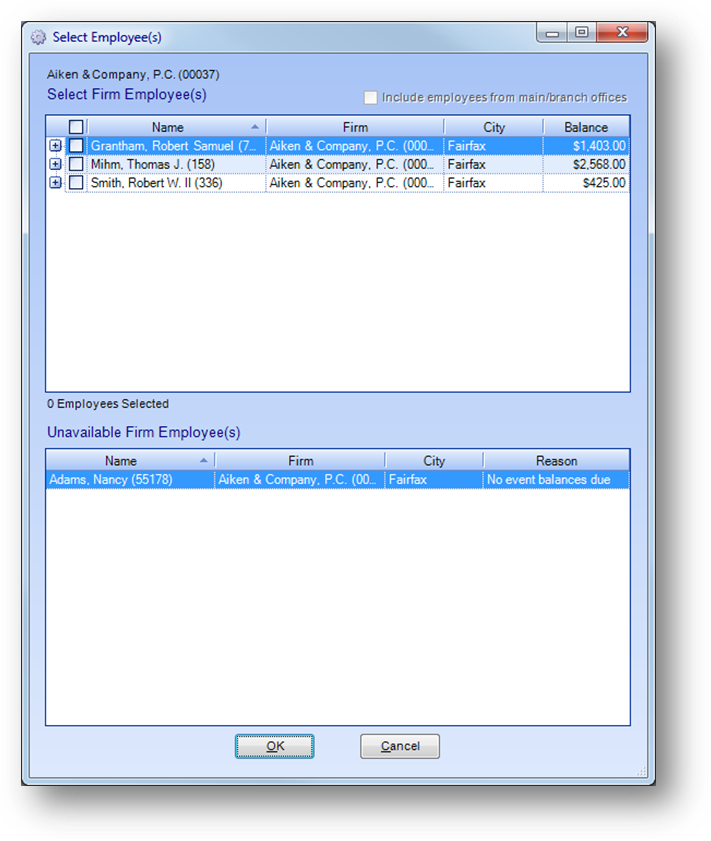
The Select Employee(s) window will be opened on top of the Group Event Payment window (see below).
The employees listed are linked to the Firm record that the routine was launched from.
The Select Employee(s) window allows you to review which employees to work with. The Select Employee(s) window is made up of two grids.
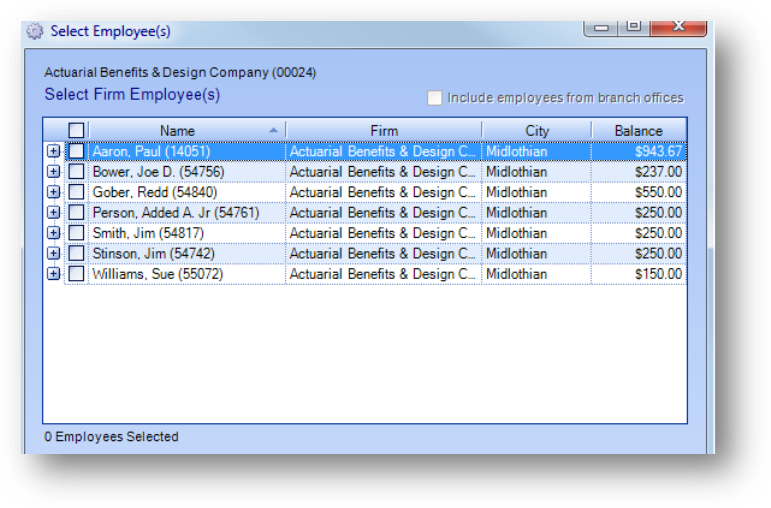
The Select Firm Employee(s) grid displays employees of the firm that have at least one registration with a balance due.

The Unavailable Firm Employee(s) grid displays all other employees of the firm. The Reason column shows why the person is unavailable for selection in this routine. A person that does not have any registrations will have a reason of “No registrations” and someone who has at least one registration, but none have a balance due, will have a reason of “No event balances due”.
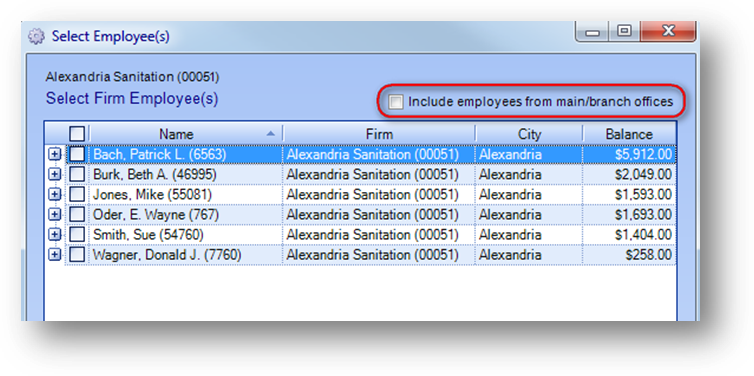
If the firm selected is a branch or main office, the Include employees from main/branch offices check box will be enabled.
If you want to make a payment for an individual from a branch or main office, check the Include employees from main/branch offices check box.

Employees from all the branch/main offices will be added to the Select Employee(s) window.
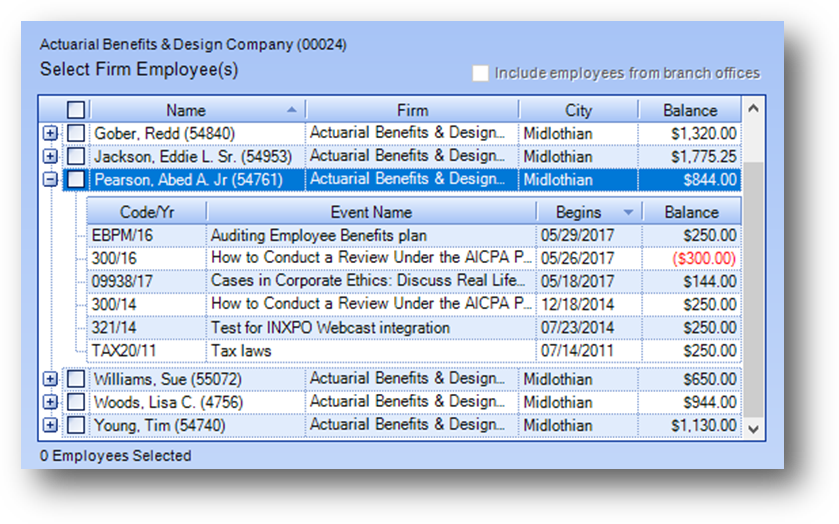
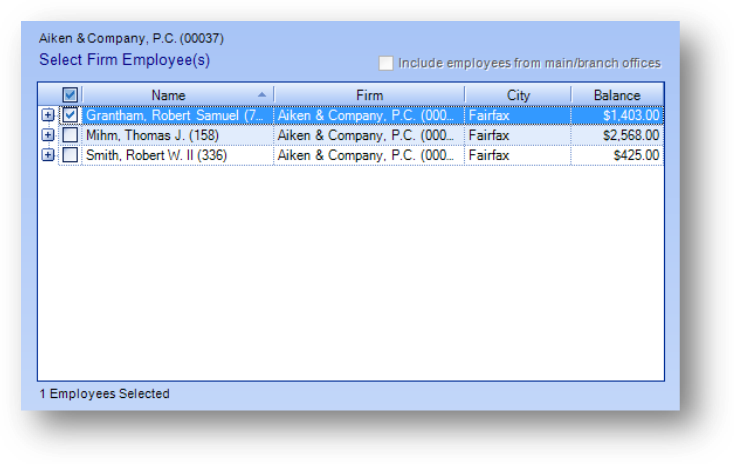
In the Select Firm Employee(s) grid Balance in the parent row shows the person’s current net balance in Events. To see the registrations that make up the net balance, click on the plus sign to the left of the parent row to expand the child rows. There is one child row for each registration, for that person, where net fees do not equal net paid. As you can see in the example above that will include registrations with a balance due as well as a credit balance.
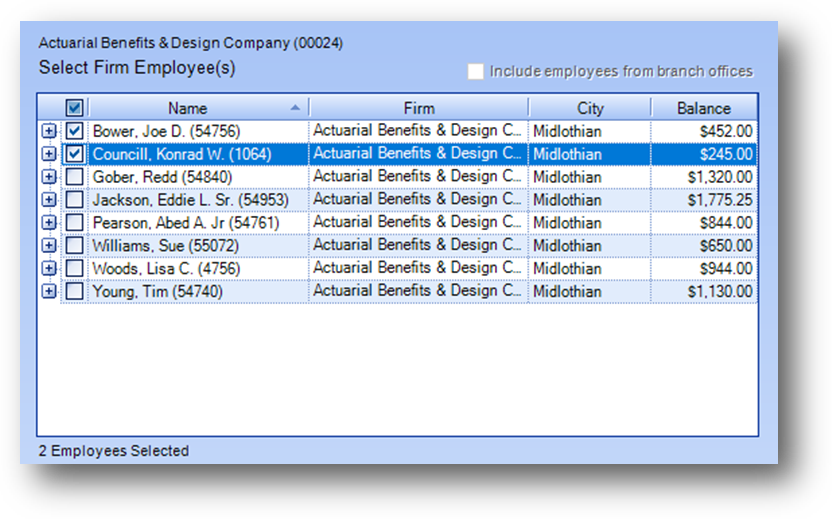
Check the select box for all employee(s) to make a payment for. Under the grid in the Select Firm Employee(s) grid is a count of Employees Selected.
When all the employees of the firm to work with have been selected, click OK.
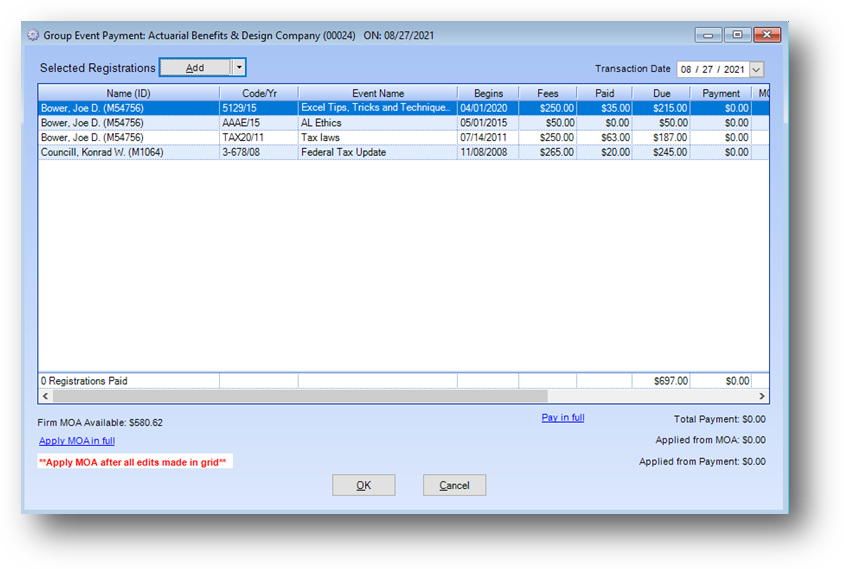
Registrations for the selected employees will be listed in the Selected Registrations grid on the Group Event Payment window. There will be a record for each registration, for each employee selected, that has a balance due. Note: Since this is a payment routine, any child rows displayed on the previous screen for registrations with a credit balance, will not be displayed in the Selected Registrations grid.
If a person that the firm paid for was not listed on the Select Employee(s) window, meaning that they are not currently linked to the firm the routine was launched from, or they have no current balance, you can use the Add button to add the person to the Selected Registrations grid on the Group Event Payment window.
Note: If not linked to the firm you may want to review the persons Names file maintenance record to see why they are not linked to the firm that is paying for their registration.
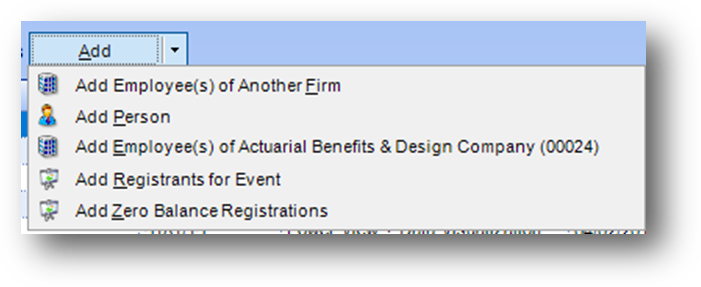
Click the down arrow on the right of the Add button to open the drop-down menu. The options in the drop-down menu are Add Employee(s) of Another Firm, Add Person, Add Employee(s) of {firm name routine was launched from} {(firm ID)}, Add Registrants for Event and Add Zero Balance Registrations.
Select Add Employee(s) of Another Firm to select employees from a firm other than the firm the routine was launched from.
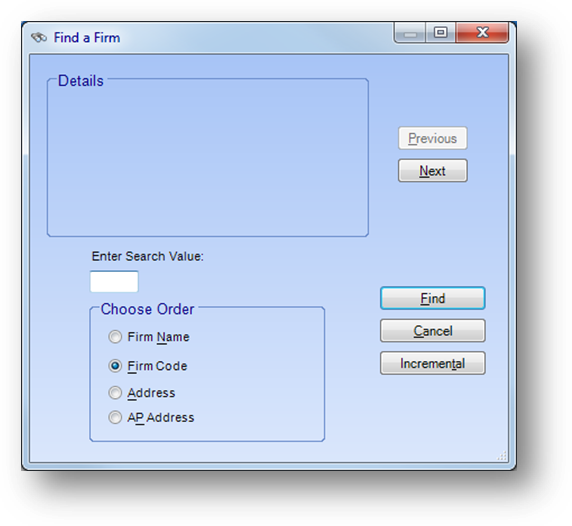
This will open the firm search screen. Locate the firm and click OK.
The Select Employee(s) window will then open allowing you to select which employees’ registrations to bring into the Selected Registrations grid. The same rules apply here as to which employees are shown in the Select Firm Employee(s) grid vs the Unavailable Firm Employee(s).
Select the people making a payment for. When the employee(s) to work with are selected, click OK. The selected employee(s) will be added to the bottom of the Selected Registrations grid.
Select Add Person to select an individual names record.
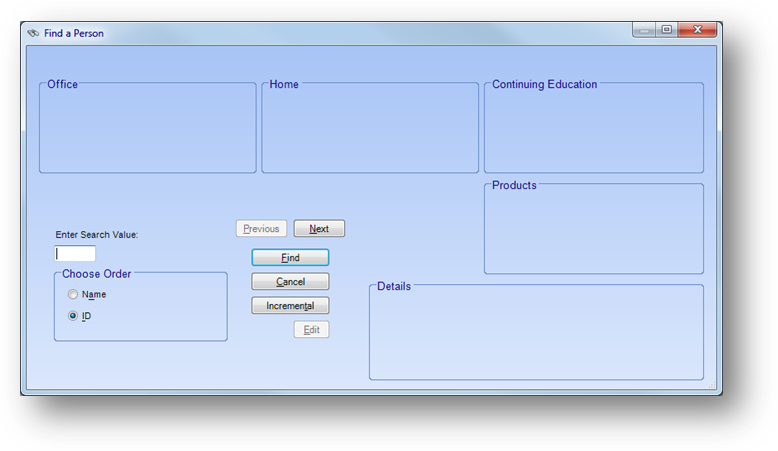
This will open the Find a Person window. Locate the person and click OK. Note: The search screen is filtered to only locate those people with at least one registration with a balance due. Once selected, the person will be listed at the bottom of the Selected Registrations grid.
Select Add Registrants for Event to select registrants from an event. Note: Only course sale events are available in this search.
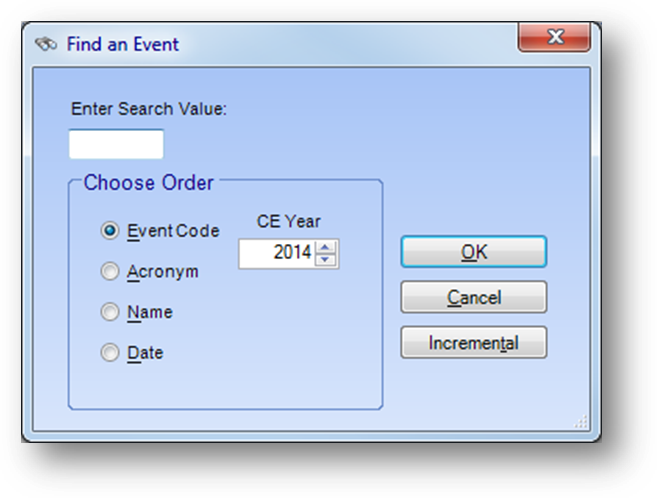
This will open the Find an Event window. Locate the course sale event and click OK. Note: Only registrants in the selected event who have an outstanding balance and do not already have a row in the Selected Registrations grid for the selected event will be added to the Selected Registrations grid. The records will be listed at the bottom of the grid.
Select Add Zero Balance Registrations to select registrants without a current balance.
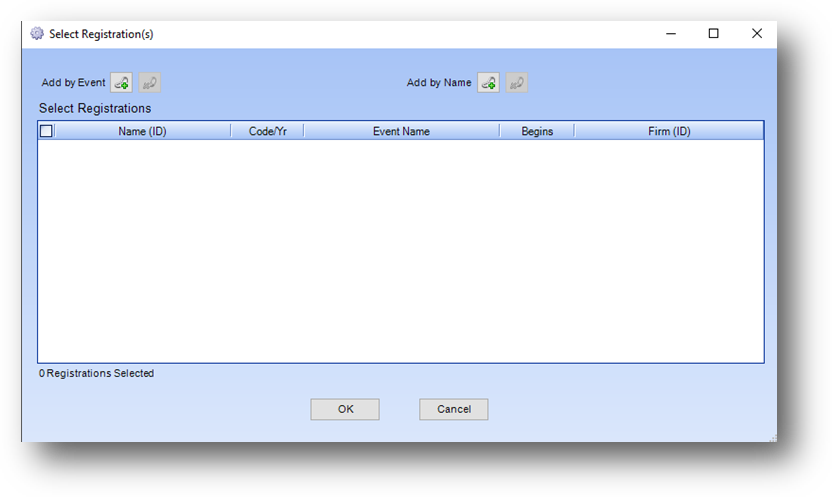
This will open a Select Registration(s) window. Select either the Add by Event or Add by Name link button.
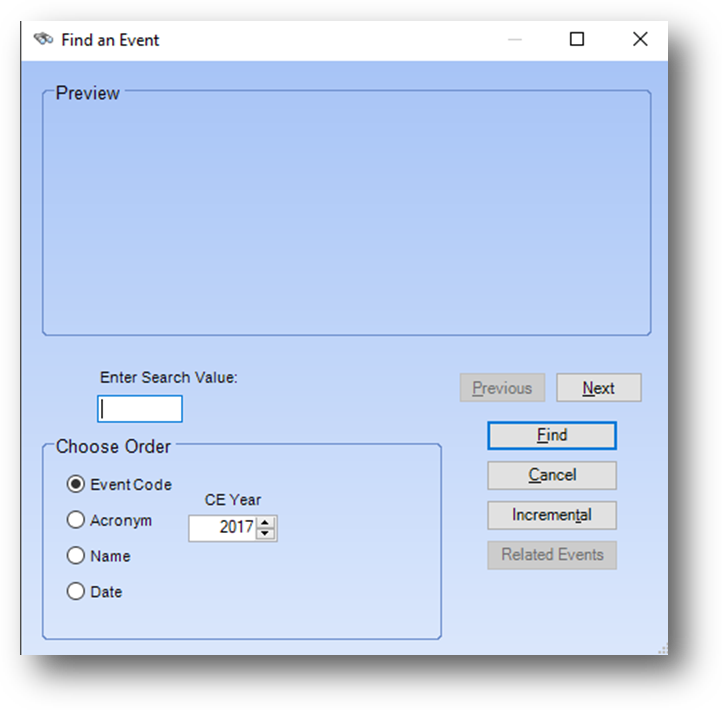
When Add by Event is selected, the Find an Event window will open. Locate the event and click OK.
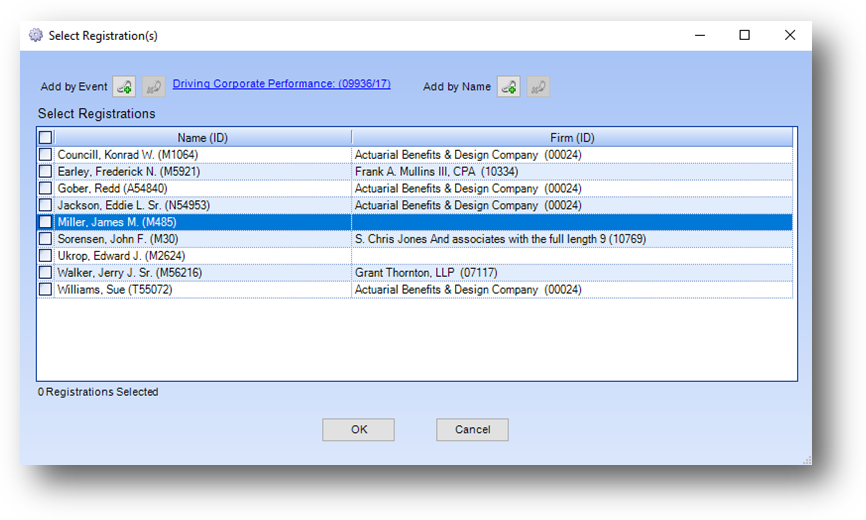
Current registrants with a zero-balance due will be brought into the Select Registrations grid. Select the people making a payment for. When the registrants to work with are selected, click OK. The selected registrants will be added to the bottom of the Selected Registrations grid.
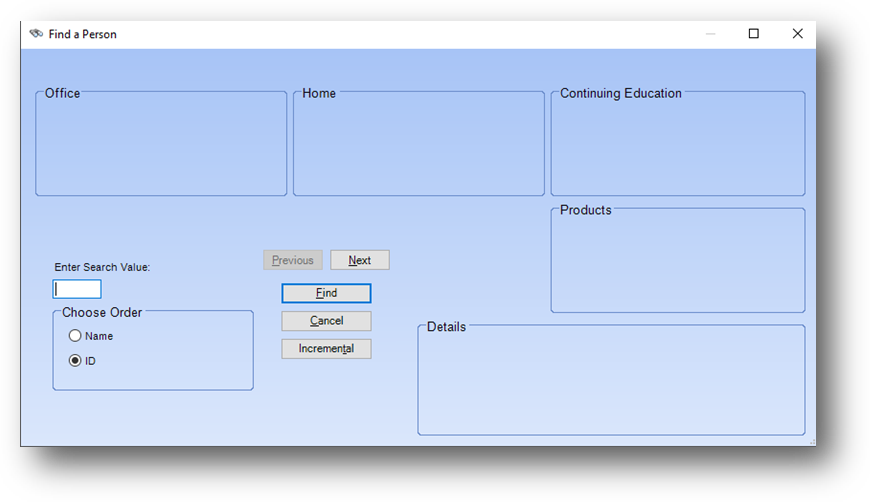
When Add by Name is selected, the Find a Person window will open. Locate the person and click OK.
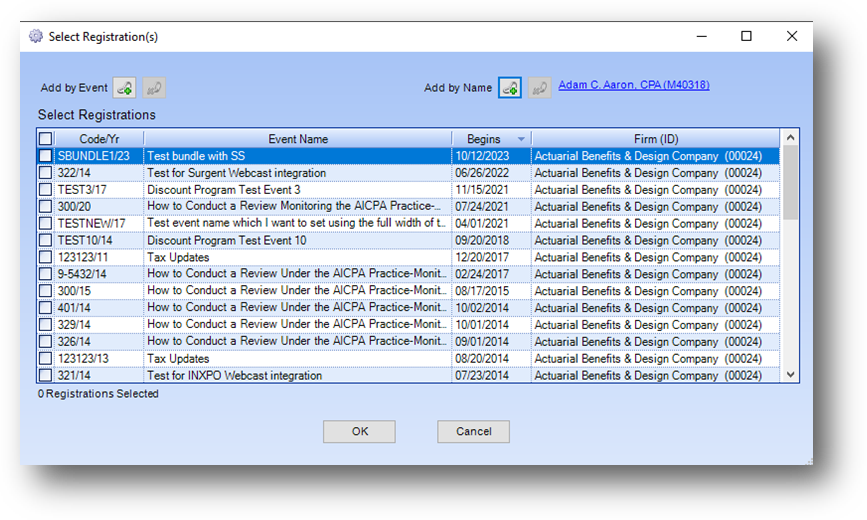
Current event registrations with a zero-balance due will be brought into the Select Registrations grid. Select the registrations making a payment for. When the registrations to work with are selected, click OK. The selected registrations will be added to the bottom of the Selected Registrations grid.

To delete a registration for a person already in the Selected Registrations grid right click on the row to open the context menu.
Select Delete - {Name (ID) Event Code / Yr} from the context menu.
Note: The Transaction Date in the upper right above the grid is only visible when entering a credit card payment. When this routine is launched from Cash Receipts Batch Entry the Transaction Date is hidden since the transaction date used in that case is the cash batch date.
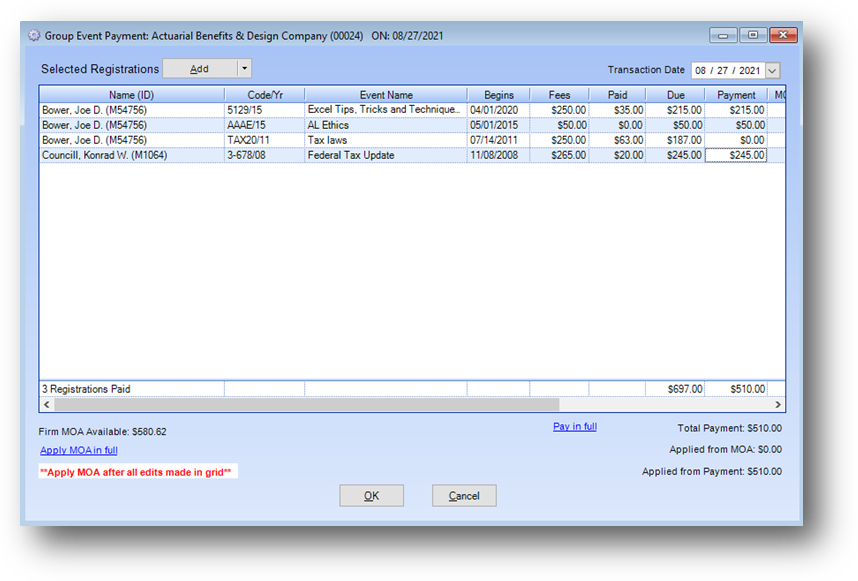
Enter the amount to be paid in Payment for each registration being paid.
At the bottom of the grid is a total row showing a count of people in the Selected Registrations grid that have had a Payment entered, as well as a total for Due, Payment, and MOA Applied.
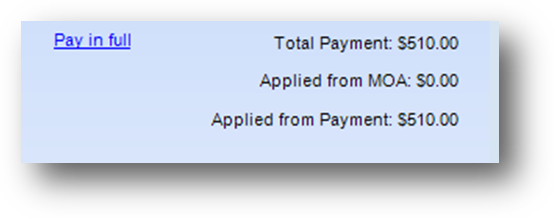
Total Payment on the right under the grid shows the total amount to be paid by the firm.
Applied from MOA shows the total amount of firm MOA applied.
Applied from Payment shows total amount to be paid
by credit card or check.
If you want to set Payment to Due for all registrations shown in the Selected Registrations grid, click the Pay in full link text under the right side of the Selected Registrations grid. The link text will then change to Clear all payments. Clicking the Clear all payments link text will set Payment to zero for everyone in the grid.
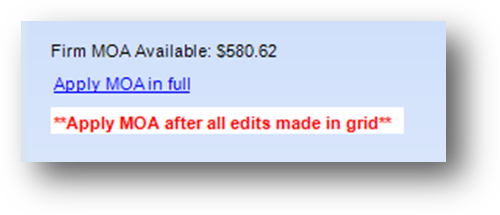
Firm MOA Available $XX is the available amount of Firm MOA from the firm the routine was launched from.
Note: Only MOA from the firm the routine was launched from is available for use.
Note: MOA can only be applied to linked employees of the firm the routine was launched from or employees of a main/branch office of that firm. Firm MOA cannot be applied to a name not linked to the firm the routine was launched from or one of its main/branch offices.
To apply firm MOA to linked employees or employees of a main/branch office in the grid, click the Apply MOA in full link text.
Warning: It is recommended that clicking Apply MOA in full be the last thing done, after all other information has been updated in the grid for the employees, before clicking OK.
Warning: If MOA Applied amount(s) are entered before edits to Payment are made, the amount in MOA Applied will not be changed. This is why it is recommended that entering MOA Applied be the final thing done after all other edits have been made to the rows in the Selected Members grid.
Note: If Firm MOA Available is less than the total payment for all linked employees or employees of a main/branch office in the Selected Members grid, the system will set MOA Applied to the total payment until all of the available firm MOA has been used. That means that some employees could have a partial payment applied from MOA and some have no MOA applied.
The link text will then change to Clear all MOA. Clicking Clear all MOA link text will set all MOA Applied amount to 0.
Note: If Firm MOA available is 0 the Apply MOA in full link text is disabled.

Firm MOA can also be manually entered in MOA Applied.
Note: If manually enter/edit MOA Applied amount be sure to check that not over paying for any one registration.
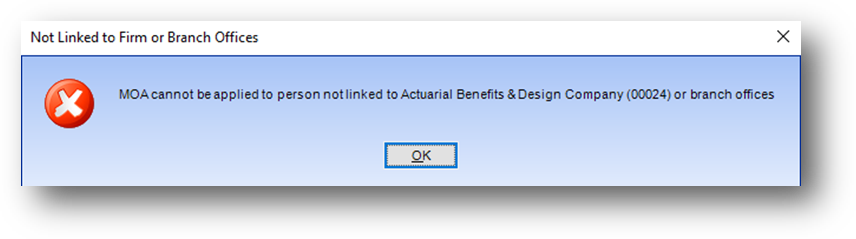
If MOA Applied is manually entered for a person not linked to the firm the routine was launched from or one of its main/branch offices, the above message will be shown and MOA Applied will be reset to zero.
When all the payments have been added in the Selected Registrations grid, click OK.

When click OK, if Applied from Payment is a negative amount the above message is shown.

When click OK, if Applied from MOA is more than Firm MOA Available the above message is shown. Adjust the MOA Applied amount(s) until Applied from MOA is less than or equal to Firm MOA Available.

A recap message will be shown with the transaction date, total event payment, and firm MOA applied (if applied). Click Yes to continue.
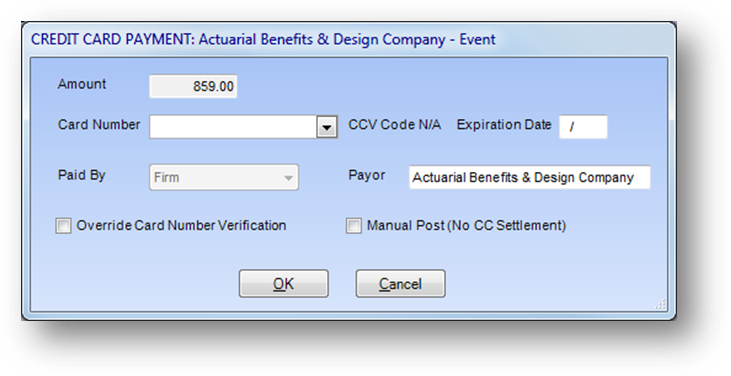
When the routine is launched from Firms file maintenance, if Applied from Payment is greater than 0 (Total Payment not completely paid with Firm MOA), the Credit Card Payment window will open.
Note: The Credit Card Payment window will show the payor information as the firm the routine was launched from. Even though in the Selected Registrations grid you are allowed to enter people from other firms, as well as individuals, there can only be one payment for the total amount and that is processed under the firm you launched the routine from.

When launching the routine from Cash Receipts Batch Entry, In the Check Item Entry group box, you must use the Firm button. Then enter the firm check information.

When a firm check is entered an arrow will be displayed on the Event Payments button in the Apply To group box.
Click on the down arrow to the right of the Event Payments button to open a listing of options. The listings are Apply to Linked Persons, Group Payment, and Group Registration (With Fees). Selecting Apply to Linked Persons launches the standard Event Payment routine.
Select Group Payment to launch the Group Event Payment routine.
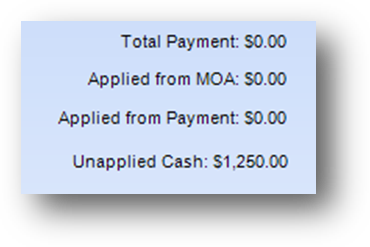
When the Group Event Payment routine is launched from the Cash Receipts Batch Entry routine an Unapplied Cash amount from the check will be shown in the lower right corner of the window.
As you enter amounts in Payment the Total Payment will increase and Unapplied Cash will decrease.
Note: If the Unapplied Cash amount from the check is less than the total due for all registrations in the Selected Registrations grid, clicking the Pay in Full link text will only set Payment equal to Due on registrations until the unapplied amount from the check gets to zero. That means that some registrations could have a partial payment entered and some may have no payment at all.
If you enter payment amount(s) that exceed the available cash from the check, Unapplied Cash will show a negative amount.
You cannot exit the routine when Unapplied Cash is a negative amount. To exit the unapplied amount must be zero or a positive amount.
Watch the Group Event Payment video:
See also