Purpose: This feature allows for uploading of a Windows compatible document (ie.. PDF document, Excel spreadsheet, Word document, or Images) to records in the system. Adding, editing, and deleting of an uploaded document is performed from this routine. The uploaded documents can also be viewed or saved outside the system from this routine. Retention information for a document can be added using this routine.
Launch Point: This routine can be launched from file maintenance tabs or grids in the following location(s) by selecting Manage Documents from the context menu:
•Names → File Maintenance → Name Tab →
•Names → File Maintenance → Leader Tab →
•Names → File Maintenance → Leader Tab → Assignments Grid →
•Names → File Maintenance → Event Tab → Registrations Grid →
•Names → File Maintenance → Accounts Payable Tab → Accounts Payable Invoices and Credits Grid →
•Names → File Maintenance → Review Tab →
•Names → File Maintenance → Products Tab → Product Details Grid →
•Firms → File Maintenance → Name Tab →
•Firms → File Maintenance → Facility Tab →
•Firms → File Maintenance → Facility Tab → Event Assignments Grid →
•Firms → File Maintenance → Vendor Tab →
•Firms → File Maintenance → Vendor Tab → Vendor Assignments Grid →
•Firms → File Maintenance → Accounts Payable Tab → Accounts Payable Invoices and Credits Grid →
•Firms → File Maintenance → Review Tab →
•Firms → File Maintenance → Products Tab → Product Details Grid →
•Committees → File Maintenance → Name Tab →
•Committees → File Maintenance → Meetings Tab → Committee Meeting History Grid →
•Products → File Maintenance → Item Information Tab →
•Events → File Maintenance → Name Tab →
•Events → File Maintenance → Sessions Tab → Sessions Grid →
•Events → File Maintenance → Leaders Tab → Leaders Assigned Grid →
•Events → File Maintenance → Registrations Tab → Registrations Grid →
•Events → File Maintenance → Facility Tab →
The document icon shown on the tab or in the grid will vary depending on if there are uploaded documents or not on the record for the related document class.
If there are no uploaded documents, for the related document class, the document icon will show as a plain piece of paper.
If there is at least one uploaded document, for the related document class, the document icon will be a piece of paper with a check mark.
On a tab with a document icon, right click to open the context menu.
On a parent row in a grid with a document icon, either right click on the row, or highlight the row and press the context menu key to open the context menu.
Then select Manage Documents from the context menu to launch the Manage Documents routine.
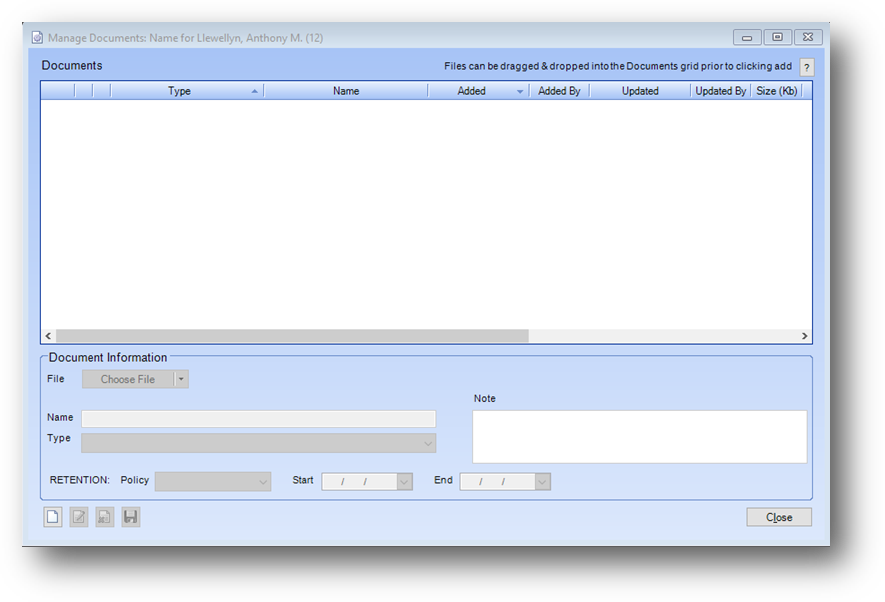
Example: When the routine is launched a window will open
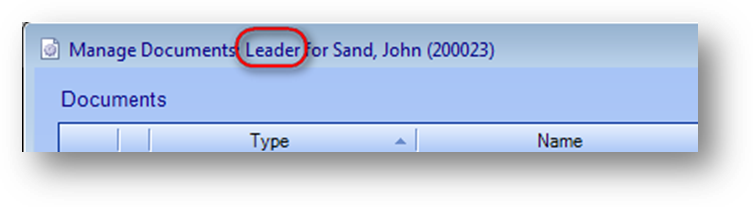
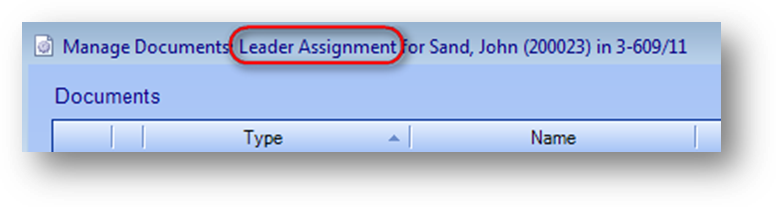
The launch point is what determines the document class. For example if launched from the Names name tab the class is Name, if launched from the Names leader tab the class is Leader, and if launched from the Assignments grid on the Names leader tab the class is Leader Assignment.

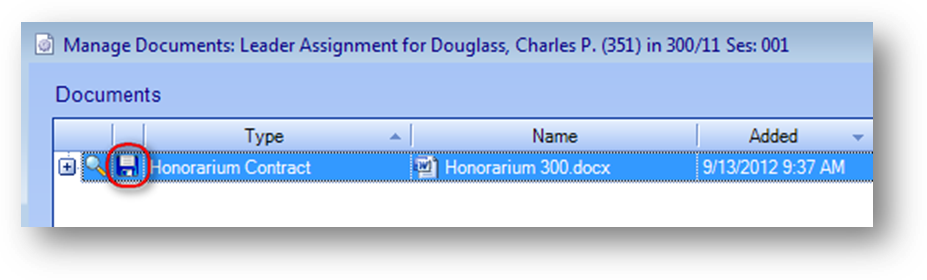
The class is shown in the title bar after “Manage Documents”. Here the text in the title bar shows Leader because it was launched from the Name leader tab.

Here the text in the title bar shows Leader Assignment because it was launched from the Names leader tab Assignments grid.

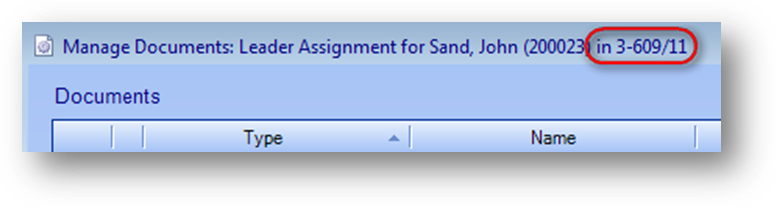
In some cases, like Leader Assignment, the title bar also shows related “applies to” information. In this example the title bar shows “in 3-609/11” because the documents displayed are not just for leader assignments for John Sands, but only for the leader assignment for John Sands in event 3-609/11.
The Manage Documents routine is controlled by the document class for which the routine was launched. So if the routine is launched for the Event class then the display and all the functionality of the routine will be related to only the Event class. If you launch the routine for the Leader Assignment class then the display and all the functionality of the routine will be related to only the Leader Assignment class.
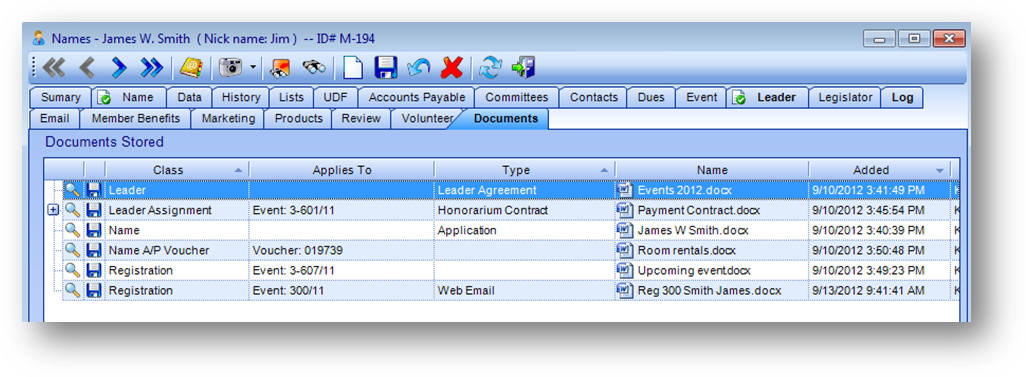
Documents
The Documents grid only displays documents for the class displayed in the title bar. When launched from the Events session tab, only document records with a class of Event Session are displayed. If launched from the Names Leader tab Assignments grid then only records with a Leader Assignment class uploaded for the specific event assignment launched from will be displayed.
So, for example, even though there are 6 uploaded documents on the Documents tab for this person.
When this routine is launched from the Names name tab only 1 document is shown in the Documents grid because this is the only 1 with a document class of Name.
And when launched from the Names leader tab, for the same person, just 1 document is shown in the Documents grid since it is the only uploaded document with a class of Leader for this person.
The list below shows launch points and their related document class.
Names → File Maintenance → Name Tab: Name
Names → File Maintenance → Leader Tab: Leader
Names → File Maintenance → Leader Tab → Assignments Grid: Leader Assignment
Names → File Maintenance → Event Tab → Registrations Grid: Registration
Names → File Maintenance → Accounts Payable Tab → Accounts Payable Invoices and Credits Grid: Name A/P Voucher
Voucher Request Maintenance → A/P Voucher Requests Grid: Name A/P Voucher Request
Names → File Maintenance → Review Tab: Name Review
Name → File Maintenance →Products Tab → Product Details Grid: Product Sale
Firms → File Maintenance → Name Tab: Firm
Firms → File Maintenance → Facility Tab: Facility
Firms → File Maintenance → Facility Tab → Event Assignments Grid: Facility Assignment
Firms → File Maintenance → Vendor Tab: Vendor
Firms → File Maintenance → Vendor Tab → Vendor Assignments Grid: Vendor Assignment
Firms → File Maintenance → Accounts Payable Tab → Accounts Payable Invoices and Credits Grid: Firm A/P Voucher
Voucher Request Maintenance → A/P Voucher Requests Grid: Firms A/P Voucher Request
Firms → File Maintenance → Review Tab: Firm Review
Firms → File Maintenance → Products Tab → Product Details Grid: Product Sale
Committees → File Maintenance → Name Tab: Committee
Committees → File Maintenance → Meetings Tab → Committee Meeting History Grid: Committee Meeting
Products → File Maintenance → Item Information Tab: Product
Events → File Maintenance → Name Tab: Event
Events → File Maintenance → Sessions Tab → Sessions Grid: Event Session
Events → File Maintenance → Leaders Tab → Leaders Assigned Grid: Leader Assignment
Events → File Maintenance → Registrations Tab → Registrations Grid: Registration
Events → File Maintenance → Facility Tab: Facility Assignment
Note: There is an External CE document class shown on Names → File Maintenance → External CE Tab → External CE sub-tab. There is no launch point for this class. These documents can only be added via a website API.

To view a document, click the View icon to the left of the row.

To save the document outside the system, to a local or network drive, click the Save icon to the left of the row.
Note: When working with a document that has a class of Name A/P Voucher Request, Name A/P Voucher, Firm A/P Voucher Request or Firm A/P Voucher, the save file path defaults to the path set in A/P Documents Path in user preference.
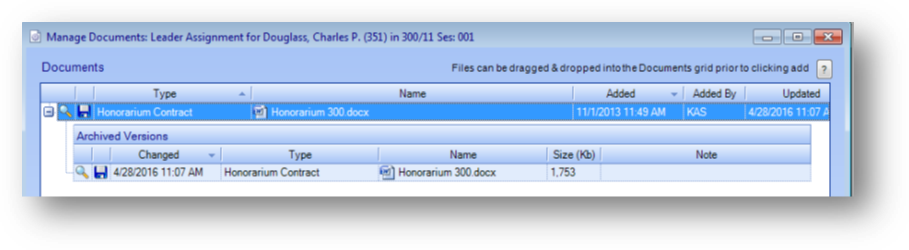
The Documents grid is grouped by document. There is one parent row for each uploaded document. Click on the plus sign to the left of the document row to see child rows detailing changes made to the document record.
The View and Save icons to the left of a child row function in the same way they do on a parent row. Note: When you view a document from a child row the document name displayed will be appended with the date and time that child record was added to the system.
Note: When used on a child row you are viewing or saving the uploaded document as it was at the time the child row was created which may not be the same as the current document on the parent row. To view or save the current document you must use the icons in the parent row.
Unassigned Document
The unassigned document function allows for a short-term storage area, within AM.Net, for documents which can be accessed when uploading documents in manage documents. This function must be turned on by CDS. Contact CDS if you are interested in utilizing the unassigned document function.
If your association has the unassigned document function turned on, adding an unassigned document to the system is accomplished by emailing the document.
From your work email account create a new email message. Set the TO address to {state abreviation}[email protected] (ie..for New Hampshire that would be [email protected]). The Email Subject entered will show in the system related to all documents sent in the email. Attach one or more documents and send the email.
Periodically, default is 5 minutes, the system will process emailed documents and add them into the system as an unassigned document. After the email documents are processed an email is sent to the sender of the email giving them a status on the document(s) emailed.
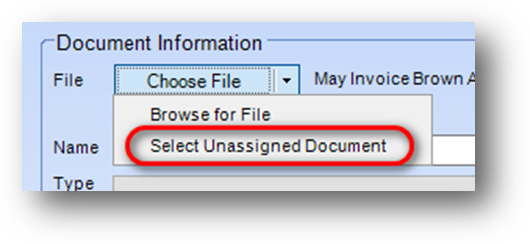
To see unassigned documents in the system select Select Unassigned Document from the drop-down list on the Choose File button in manage documents.
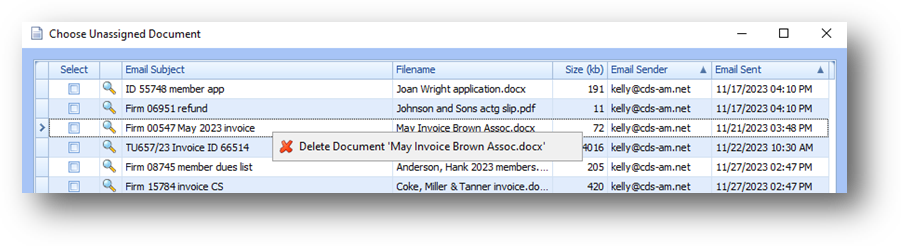
That will open the Choose Unassigned Document window which shows all unassigned documents in the system.
The grid has one row per document emailed. The Email Subject and Filename along with the from email address and date sent are shown in the grid.
To view a document, click the View icon to the left of the row
Documents are intended to be unassigned for a short period of time. Soon after being added to the system an unassigned document should be uploaded in manage documents. Note: After an unassigned document has been uploaded in manage documents it is deleted as an unassigned document.
Note: If an unassigned document will not be uploaded in manage documents, perhaps there is a newer version of the document or emailed in error, it needs to be deleted.
To delete an unassigned document, right-click on the row in the Choose Unassigned Document window. Note: If an unassigned document is deleted in error it will need to be emailed again.
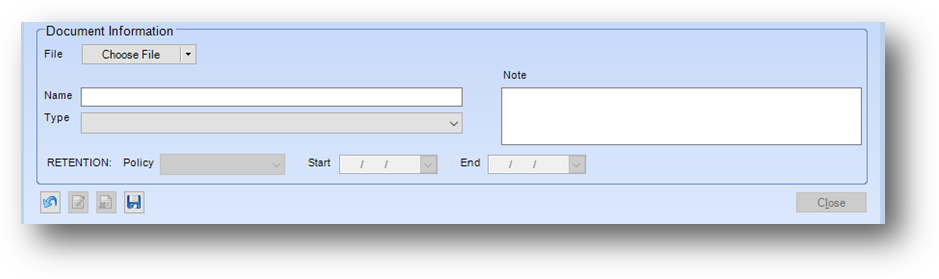
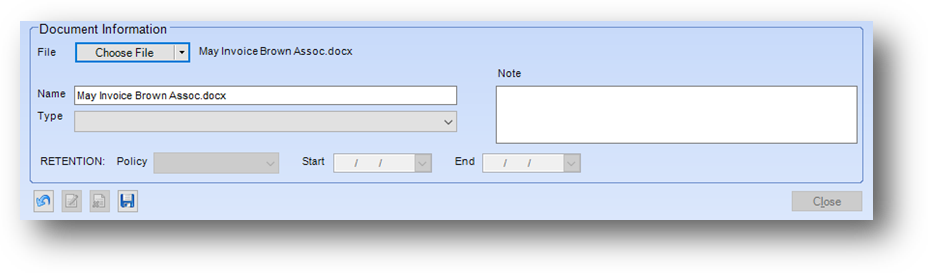
Document Information
This section displays details for the highlighted record in the Documents grid. The fields in this section are controlled by the in-place buttons in the lower left of the window.

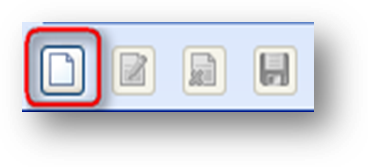
If there have been no documents uploaded yet, and the Documents grid is empty, the only button that will be enabled is the in-place Add button.

Once at least one document is in the Documents grid, the in-place Add, Edit, and Delete buttons will be enabled.
The in-place Add button allows for adding a new uploaded document for the class which the routine was launched from. To add a new document, click on the in-place Add button.
This will enable the fields in the Document Information section.
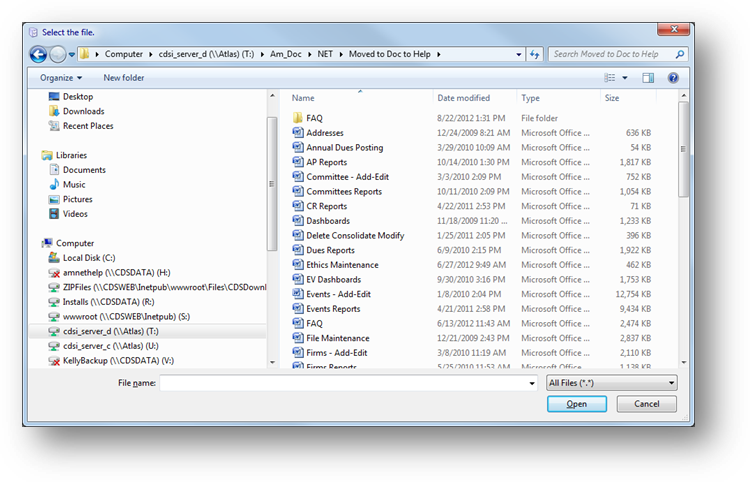
If the unassigned document function has not been turned on at your association, the select file window will open automatically.

Select the document to upload.
Note: When working with a document that has a class of Name A/P Voucher Request, Name A/P Voucher, Firm A/P Voucher Request or Firm A/P Voucher, select the file path defaults to path set in A/P Documents Path user preference.
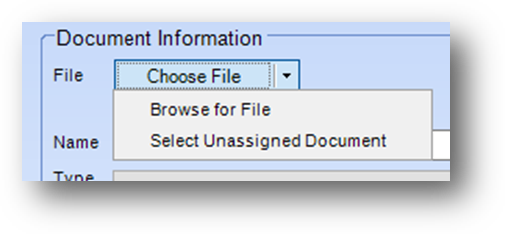
Note: If you close the select file window without selecting a document, click the down arrow on the Choose File button, select Browse for File and the select file window will open.
Note: When the unassigned document function is turned off, Select Unassigned Document is disabled.
After the document has been selected.

The file path selected will be displayed in File.
If your association has the unassigned document function turned on, click the down arrow on the Choose File button and select either Browse for File or Select Unassigned Document.

Browse for File opens the select file window and allows you to select a file from your local computer or network.
Select the document to upload.
Select Unassigned Document opens the Choose Unassigned Document window and allows you to select an unassigned file. See Unassigned Document section above for where the files listed here come from.
This window shows all unassigned documents in the
system.
Check the select box on the row of the document you want to upload.
Note: Once an unassigned document has been uploaded it will no longer show in the choose unassigned document window.
After the document has been selected.
If Browse for File was used, the file path selected will be displayed in File.
If Select Unassigned Document was used, the file name is displayed in File.
Note: A new document can also be added by dragging and dropping the file into the Documents grid prior to clicking the in-place add button. The drag and drop functionality works with Windows compatible files located in Windows Explorer, attached to a Microsoft Outlook message, or on a Windows Desktop.
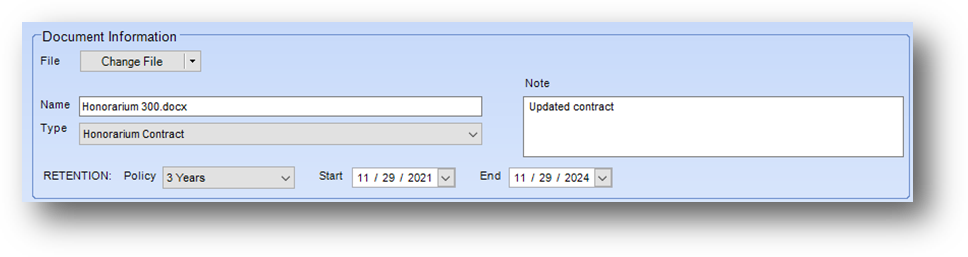
Name: Will default to the file name of the document selected to be uploaded. You can change the name shown for the uploaded document by typing a new name. Note: Once the uploaded document has been saved the text in Name is what is shown as the document name in the system. Once saved the text displayed in File will be cleared.
Type: Select a Type, if applicable. Type is a sub-set of the document class. The list in this field is user-defined.
Note: The Type is related to the document class the routine was launched for. When launched for the Committee class the type field will only show type listings related to the Committee class.
Note: When you add a new Type the system will automatically add the related class information for the new listing depending on what class the routine was opened for.
Note: Enter a Note, if applicable.
Retention: Type, Policy, Start and End work together. Policy, Start and End are disabled until a Type is selected.
Policy: Once a Type is selected, if the selected type has a retention policy set in Document Management Policy, Policy, Start and End will populate with the appropriate information. If there is no retention policy set for the selected type a policy can be selected manually.
Start: When a Policy is selected, will be populated with the current date. Note: When a policy of Permanent is selected this field is left blank and disabled. Note: If edited, End will automatically update according to the selected policy unless Policy is blank.
End: When a Policy is selected, will be populated with the appropriate date according to the policy and start date. Note: When a policy of Permanent is selected this field is left blank and disabled.
Once all the related document information has been added click the in-place Save button.
Note: There is a size check done on the selected file when in-place save is clicked. If a type is selected, and that type has a Max Size (Mb) set in Document Management Policy, the check is done against that document type’s max size setting. Otherwise the size check is done against the Manage Documents - Maximum file size in MB set in System Preferences.
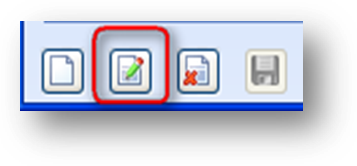
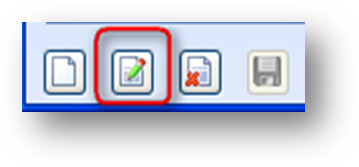
To edit a document record, first highlight the desired record in the Documents grid. Then click the in-place Edit button. This will enable the fields in the Document Information section. Make changes as needed and click the in-place Save button.
To change the uploaded document, click the down arrow on the Choose File button and select either Browse for File or Select Unassigned Document (if applicable) then select the new document. Update other fields as needed. Click Save. A history child row will be added to the grid for that document.

To delete a document, first highlight the desired document record in the Documents grid. Then click the in-place Delete button. You will be asked to confirm the deletion in the following pop-up window:
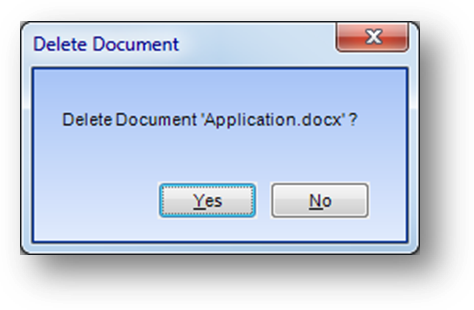
Note: If the document has a policy of Permanent or a retention end date that is in the future, that will be reflected in the delete confirmation message. In those cases, the document should only be deleted if that information is incorrect.
Note: The document class on an existing uploaded document cannot be changed. If a document is uploaded to an incorrect document class, you need to delete the document record under the incorrect document class and add a new record under the correct class.
Watch the Manage Documents video:
Watch the Manage Documents System Preferences video:
Watch the Manage Documents Users and System Security video:
See also