Purpose: To post dues billings to all active members. Applicants can also be included if desired.
Launch Point: This routine can be launched from the following location(s):
•Dues → Routines → Special Routines →
Example: When the routine is launched a window will open
Posting annual dues involves more than just this one routine. There is actually a process of multiple steps that should be followed which includes several reports and routines for posting of your annual dues.
The overall annual dues process involves two separate and distinct procedures:
•Posting the annual dues
•Printing the invoices
Users sometime confuse the terms “invoicing” and “posting” in the system. Here’s the difference.
Posting refers to updating data to tables in the system. Invoicing, on the other hand, refers to the process of printing and sending invoices to members.
When you post annual dues a billing record is added to the Dues Journal table, reflecting the amount the individual owes for the new year’s dues. After these records are added, the system adjusts each person’s balance in the Dues Ledger table to include the new year’s amount. In some instances, such as for a new member who has never been billed for dues, the system will add a new record to the Dues Ledger table.
Annual dues process
The actual posting of the dues is handled in the Post Annual Dues routine. However, to insure the posted data is valid you should follow the outlined annual dues process steps below in the order listed.
1. Review billing classes and other data
Each association has a custom billing class program in their system that assigns billing classes to each member based on the member’s specific data each time a save is performed on a Names record. If the billing class is based on member type, for example, the billing class program would change the billing class whenever you change a person’s membership type. With this in mind, you must determine two things before proceeding with the dues posting:
•Has your billing class structure changed in any way?
•Have you changed the codes stored in the system in any way that might contradict the logic used to determine each individual’s class?
If the answer to either of these questions is yes, contact CDS support for an update to the custom billing class program. Note: Do not go beyond step 5 below until the updated custom billing class program has been loaded.
2 – Review payment plan structure and/or emails
Note: If your association does not use the payment plan functionality this step can be skipped.
If your association does use the payment plan functionality, there is a custom payment plan program that determines the options available and how plans are setup along with emails sent to those on a payment plan.
If there are any changes to your associations requirements for the setting up of payment plans, and/or emails sent to those on a payment plan, those need to be communicated to CDS support with enough lead time for those changes to be made and loaded to your system prior to posting dues in step 14. These changes must be implemented before dues payments are received which can happen any time after dues are posted.
Warning! Do not go beyond step 9 until the updated custom payment plan programming and/or payment plan emails have been loaded to your system.
3. Review dues rate table
Select Dues-Routines-Special Routines-Rates Table Maintenance. Review the dues billing classes, annual dues amount (shown in the Dues column), and the pro-rated amounts (shown in the twelve “month” columns). Update the amounts as needed.
4. Re-set Administrative Hold and Suspended records
If your association uses the member type of Administrative Hold, and you have any members with a type of Administrative Hold, you will need to temporarily re-set the type on these individuals to what it would be if they were not on hold in order for them to be placed in the correct billing classes.
If your association uses the member status of Suspended Member, and you have any members with a status of Suspended Member, you will need to temporarily re-set the status on these individuals to Member in order for them to be placed in the correct billing classes.
Note: Keep note of the individuals before you change their type or status. You will need to re-set these members back to a type of Administrative Hold or status of Suspended Member in step 18 below.
5. Review persons with a dues paid thru date
Verify the Dues Paid Thru Date on the Dues tab in Names file maintenance. Individuals with a Dues Paid Thru Date that is on or after the transaction date to be used in the Post Annual Dues routine in step 14 below, and the Dues Posting Date from step 2 of the report wizard in the Projected Dues Revenue report in step 9 below, will be excluded.
6. Recalculate dues billing classes.
Select Dues-Routines-Special Routines-Recalculate Dues Billing Classes
This routine processes the entire Names table, applies the tests in the custom billing class program, and establishes the correct billing class for each record. Although the billing class is automatically updated any time a user changes data in a Names record, running this program is still necessary for three reasons:
•To correct any erroneous assignments.
•To update any date sensitive billing classes, such as ones based on number of years certified, or years of membership.
•If any changes were made to your custom billing class program (step 1 above), this routines must be run to check all Names records against the new billing class program.
7. Print the dues error report
Select Dues-Report-Other-Error Report. This report compares the summary figures stored in the Dues Ledger table against the detailed financial transactions stored in the Dues Journal table, and then lists any discrepancies.
Note: If the system finds any discrepancies, you must correct them before proceeding further. Contact CDS support.
8. Avoid performing Names file maintenance that will affect billing class calculations
Avoid making changes in Names file maintenance that will affect billing class calculations from this point forward until the annual dues process is complete, unless the change is needed to correct a problem on the record.
9. Print the projected dues revenue report
Select Dues-Reports-Other-Projected Dues Revenue. In step 2 of the report wizard, enter the transaction date that will be used in the Post Annual Dues routine in step 14 below. That will result in the proper application of the dues paid through date. This report analyzes what your dues revenues would be if you posted dues using the current billing classes and dues rates.
There are two reasons to run this report:
•You should review the billing class breakdown in the “Analysis for entire society broken down by Billing Class” group at the top of the report for any possible discrepancies, such as a suspicious number of members in a particular billing class, inappropriate dues amounts, or anyone in the dues billing error class, which is usually class “XX”.
•You will later compare the amounts on the report to the amount of the actual posting to ensure that nothing went awry during that procedure.
Make any needed corrections to the Names records, dues rate table, or custom billing class program before moving onto step 10. Note: if changes are required to the custom billing class program you must run step 6 above again before continuing.
Note: You can also use this report to compare the effects of different dues rate changes. Select Dues-Routines-Special Routines-Rates Table Maintenance and alter the rates as desired in the Dues column. Then run this report. Repeat to compare different scenarios. Be sure to set the Dues column amounts back to the amounts you want to use for the new dues year before proceeding with the remaining steps in this process.
10. Notify staff
From this point forward, until the annual dues process is complete, no one should enter any data to the Dues module, including:
•Posting dues (using either the Dues Posting or Post Monthly Dues routine).
•Making dues adjustments (using either the Dues Adjustment, Dues Payment, or Group Dues Payment routine.
•Receiving and/or posting dues payments (cash or credit card).
•Issuing dues refunds (using either the Refund Credit Balances or Refund a Specific Payment routine).
Otherwise, the balances you compare before and after posting annual dues may not equal.
All other regular operations in other modules may continue.
11. Print the aged receivables report
Before running the aged receivables report you need to close any outstanding cash receipts batches containing dues payments. Also, make sure any pending credit card dues payments or refunds have been processed to and from the bank. If there are any dues refund vouchers waiting to be paid you will want to cut those checks now.
Select Dues-Reports-Receivables-Aged Receivables. Leave all report defaults as they appear. The report will show anyone who still owes dues, or have a credit balance, from prior years. Review the report for any discrepancies.
Any discrepancies found should be corrected before continuing.
If you don’t find any discrepancies, save the report to be used in step 16 below for comparing after the Post Annual Dues routine is run.
Warning! If you use the Detailed Receivables report, be aware that report is sensitive to the current dues year set in the system and will give erroneous results if you have already advanced the dues year to the upcoming year.
12. Set the new dues year
•Select File-System Preferences.
•Select Dues-General on the left of the window.
•Update the Current Dues Year.
•Click OK to save and exit.
Warning! Do not advance the dues year until you complete all the previous steps since this change may cause erratic results in some of the above reports.
13. Change the current accounting period
Note: You can skip this step if the transaction date you are going to use in step 14 below is within the current accounting period.
This step relates to the transaction date you will use in step 14 below when you run the Post Annual Dues routine. The Dues module in the accounting calendar must be set to the month of the transaction date you will be using. You want the transaction date to be the date that the payment is due. Once that transaction date has passed any outstanding dues balances are then considered past due. Most associations post the dues several months in advance of when the dues are actually due. For example, if your dues are due on May 1st and you post dues on February 15th, you have to move the accounting calendar forward on the Dues module from February to May prior to posting dues so you can use a transaction date of May 1st in the Post Annual Dues routine.
Select Utilities-Routines-Accounting Setup-Update Accounting Calendar or Select Current Periods. Change the Current Period Selections for Dues to the applicable month. Revenue from the annual dues will be posted to the general ledger in the selected accounting period, assuming you are using the systems month-end G/L Journal Entries procedures.
Note: You will need to set the month for the Dues module back to the current period once the dues are posted, see step 17 below.
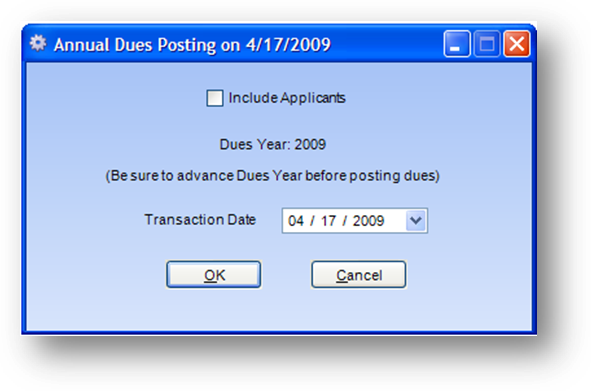
14. Post annual dues
•Select Dues-Routines-Special Routines-Post Annual Dues.
•Verify that the Dues Year is correct.
•If you are going to include applicants, check the Include Applicants checkbox.
•Update the Transaction Date as needed. Note: This should be the date that payment for that year’s dues is due.
•When you are ready to begin the posting routine, click OK. Because of the importance of this routine, additional confirmation windows appear. Click OK for each if you are sure you want to proceed with the annual dues posting.
The time required to run the routine will vary depending on network speed and the number of records to be posted. The routine may run from ten minutes to two hours. The Posting Completed window appears when the routine completes.
15. Print the posting summary report
Select Dues-Reports-Transactions-Posting Summary. Enter the transaction date used in the Post Annual Dues routine in step 14 above as the beginning and ending dates for the report. The report will print summary totals grouped by billing class, chapter, and date.
If you want a detailed listing of the individuals with posting you can run Dues-Reports-Transactions-Posting Details.
You should compare the totals on the Posting Summary report to the totals in the previously printed Projected Dues Revenue report. If there is any variation, check if any dues related transactions were added into the system during the annual dues process that may have caused the discrepancy. If you cannot find the reason the totals do not match, do not proceed further, and contact CDS support.
16. Print a new aged receivables report
Select Dues-Reports-Receivables-Aged Receivables. Change the “to date” in step 1 of the report wizard to the transaction date used in the Post Annual Dues routine in step 14 above.
Compare the total shown on this report to the combined total on the previously printed Projected Dues Revenue and Aged Receivables reports. They should equal. If they do not, check if any dues related transactions were added into the system during the annual dues process that may have caused the discrepancy. If you cannot find the reason the totals do not match, do not proceed further, and contact CDS support.
17. Re-set the current accounting period
If the accounting period for the Dues module was set forward in step 13 above, it should now be set back to the current period.
Warning! Once the dues year has been advanced (step 12 above), it should not be re-set to the current dues year.
18. Re-set Administrative Hold and Suspended Member
If you changed records with a type of Administrative Hold in step 4 above, you can now re-set the type on those records back to Administrative Hold.
If you changed records with a status of Suspended Member in step 4 above, you can now re-set the status on those records back to Suspended Member.
19. Release the system for use
Assuming you found no errors, the annual dues posting process is now complete. Other staff may now begin processing transactions to the Dues module.
Note: Please carefully examine any new custom dues invoices, or any changes made to existing dues invoices. Custom Data Systems, Inc. is not responsible for the mathematical accuracy of dues calculations made on custom invoices.
20. Create new payment plan for auto renew plans
This step can be skipped if your association does not use the payment plan functionality or you do use the payment plan functionality but do not have any plans on auto renew in the dues year ending.
Note: If you don’t know if your association has auto renew plans run dues–reports–payment plan–payment plan. In wizard step 1 set the dues year to the dues year ending, wizard step 2 select ‘all plan types’, wizard step 3 select ‘all plans’, and in wizard step 4 only check the box for ‘auto renew’.
If your association uses the payment plan functionality and there are plans on auto renew in the dues year ending, select Dues-Routines-Special Routines-Auto Renew Payment Plan.
This routine creates new auto renew payment plans in the new dues year for members with an auto renew plan in the prior year.
Warning! DO NOT SKIP OVER THIS STEP or DELAY running the routine. If you wait too long after adding billings for the new dues year to run Auto Renew Payment Plan, members may fully pay when they have an auto renew plan with multiple payments or not understand why they are having to setup a new plan with their payment when they said to go on auto renew in the prior year.
Note: If there is a delay, and the Auto Renew Payment Plan routine is not run until after the first day of the new dues year, plans may be setup with a scheduled payment date in the past. Each state has custom code to determine the scheduled payment dates on the new plans. Example: most societies with one-time payment plans use the first day of the new dues year as the scheduled payment date. Scheduled payments are run early in the morning, so if the Auto Renew Payment Plan routine is not run until the first day of the new dues year, or later, then those plans with a scheduled payment date on the first day of the new dues year will not be processed.
21. Create new invoice print data
You can now proceed to printing/sending invoices. This involves a three-step process detailed in steps 21, 22, and 23.
Select Dues-Routines-Invoice Process-Step 1: Create New Invoice Print Data. This routine extracts dues information on members (including billing classes, dues balances, etc.) and stores it in a temporary Dues invoice print data table. This invoice print data remains in the temporary file, and a new invoice print data file cannot be created, until it is either archived or deleted (see step 23 below).
22: Print original invoices from print file
Select Dues-Routines-Invoice Process-Step 2: Print Original Invoices From Print File. This routine uses the records in the invoice print data file and allows you to print and/or email the invoices or export the invoice data for a mailing house. Don’t be confused by the term “original”. It simply distinguishes invoices generated from this routine from any in the Duplicate Invoices(s) routine (found in Dues-Routines-Invoicing Routines).
Note: If your association uses the payment plan functionality, remember there are options in the Specify Payment Plan Option step that allow for excluding persons on payment plan in the current year.
23: Archive current invoice print data
Select Dues-Routines-Invoice Process-Step 3: Archive Current Invoice Print Data. This routine copies the information in the temporary invoice print data file to the Dues Archive table, increments the Number of Invoices Sent on the Dues tab in Names file maintenance, and deletes the data from the temporary invoice print data file. After archiving the invoice print data file, you can create a new file using step 21 above.
If the invoice print data file has errors or for any other reason you do not actually send the invoices in the invoice print data file to the members you should not archive the file. Instead, you should delete it by running Dues-Routines-Invoicing Routines-Delete Invoice Data Without Archiving. This routine deletes the data in the invoice print data file, without copying the information to the Dues Archive table or incrementing the Number of Invoices Sent on the Dues tab in Names file maintenance. After deleting the invoice print data file, you can create a new file using step 21 above.
Watch the Annual Dues Process (Part One) video:
Watch the Annual Dues Process (Part Two) video:
Watch the Annual Dues Process (Part Three) video:
See also